AI Virtual Try-On for E-Commerce: The Complete Guide
How to use AI-powered virtual try-on to generate realistic product images across clothing, jewelry, glasses, and shoes — with multi-turn refinement and the 3-stage generation method.
Traditional e-commerce product photography costs more than most sellers realize: a professional shoot for 50 items runs $1,200 or more, takes 3–5 days to coordinate, and requires physical samples in hand before a single image can be captured. AI virtual try on changes that equation entirely. Whether you need to virtual try on clothes for a Shopify listing, preview jewelry on a model, or virtual try on glasses for an eyewear store, the workflow starts the same way: upload your product photo, describe the scene you want, and refine through conversation until it’s ready to publish. This guide covers four product categories — clothing, jewelry, glasses, and shoes — an exclusive 3-stage generation method that eliminates the “plastic look” problem, and a side-by-side cost comparison showing exactly where the savings come from.
What Is Virtual Try-On and Why It Matters for E-Commerce
A virtual try on experience lets shoppers — or more practically, sellers — see a product worn or displayed on a realistic model without any physical fitting required. A virtual fitting room in its traditional sense was a consumer-facing feature embedded in brand websites: scan your body, see the jacket on your proportions. What’s emerged for e-commerce content production is something different and more immediately valuable: using AI to virtual try on clothes, jewelry, and accessories on realistic models — generating professional product images from a single reference photo at a fraction of traditional photography costs. Think of it as an AI-powered virtual fitting room that sellers control through conversation rather than code.
The business case breaks down into three areas.
Reduced return rates. Returns cost U.S. e-commerce sellers an estimated $212 billion annually. A significant share traces back to expectation gaps — the product looked different on the model, the color was off, the fit read wrong. High-quality virtual try on images showing real drape, texture, and proportion close that gap before the order is placed.
Faster product launches. Traditional photography requires physical samples, which means waiting for production runs before any marketing asset can be created. With AI try on clothes workflows, sellers can generate on-model images from a product photo — even a prototype shot on a white table. Marketing campaigns can run weeks earlier.
Dramatically lower costs. The numbers are stark. A professional shoot for 50 items typically requires a day of studio time, one or two models, a photographer, a stylist, and post-processing — totaling around 40 hours of labor and $1,200 or more in direct costs. AI batch generation for the same 50 items takes approximately 2 hours and costs around $32. The math holds across SKUs.
The current market for virtual try on tools is dominated by single-shot solutions: upload one photo, get one image, download, move on. Whether sellers ai try on clothes for Amazon or virtual try on jewelry for a DTC store, that workflow has real limits — which is why a different approach, multi-turn chat-based generation, produces consistently better results.
How Traditional Virtual Try-On Tools Work (And Their Limits)
The established players in AI virtual try on — tools like FitRoom, PicsArt’s AI Clothes Changer, and i-TryOn — follow a similar workflow: upload your product image, select a model or pose, click generate, and receive a single output image. For quick one-off use cases, this is fast and simple. For e-commerce production at any meaningful scale, three problems emerge consistently.
The plastic look. Single-pass generation struggles to blend the uploaded garment naturally onto the model body. The result is clothing that looks like a sticker applied over a mannequin — edges are soft in the wrong places, fabric folds don’t respond to the model’s pose, and texture detail flattens out. This is especially noticeable with structured garments (blazers, denim) and with any product that has distinctive surface material.
No iteration. If the output isn’t right — wrong pose, wrong lighting, background doesn’t match your brand — you start over. Upload the product image again, adjust your settings, regenerate. Each attempt is independent. You can’t tell the tool “keep everything the same but change the background to outdoor.” You have to reconstruct the entire request.
Single-category limitations. Most tools are built around clothing. Virtual try on jewelry, virtual try on glasses, and virtual try on shoes are either unsupported or handled by separate specialized tools with their own upload flows and learning curves. Running a multi-category catalog means managing multiple platforms, multiple prompt conventions, and multiple export workflows.
These limitations aren’t accidental — they’re structural. A single-shot tool is not a virtual fitting room — it’s designed for a single output, not for a production workflow. The better approach preserves context across the session.
Multi-Turn Chat: A Better Way to Virtual Try-On
The core difference between a single-shot tool and a chat-based approach isn’t the underlying AI model — it’s whether the system remembers what you’ve already done. In a chat-based virtual try on workflow — whether you’re generating virtual try on clothes images or ai try on clothes for a new catalog — every message builds on the previous ones. The AI holds the product reference, the model description, and the scene context across the entire session. You refine rather than restart.
Here’s how that plays out practically. The following comparison covers the capabilities that matter most for e-commerce production:
| Feature | Single-Shot Tools | Chat-Based (Banana AI) |
|---|---|---|
| Iterations | 1 (re-upload to retry) | Unlimited (refine through conversation) |
| Context | None (each upload is fresh) | Full session history preserved |
| Reference Images | 1 | Up to 8 (Pro) / 14 (NB2) |
| Resolution | Varies | Up to 4K |
The difference in output quality is immediately visible:
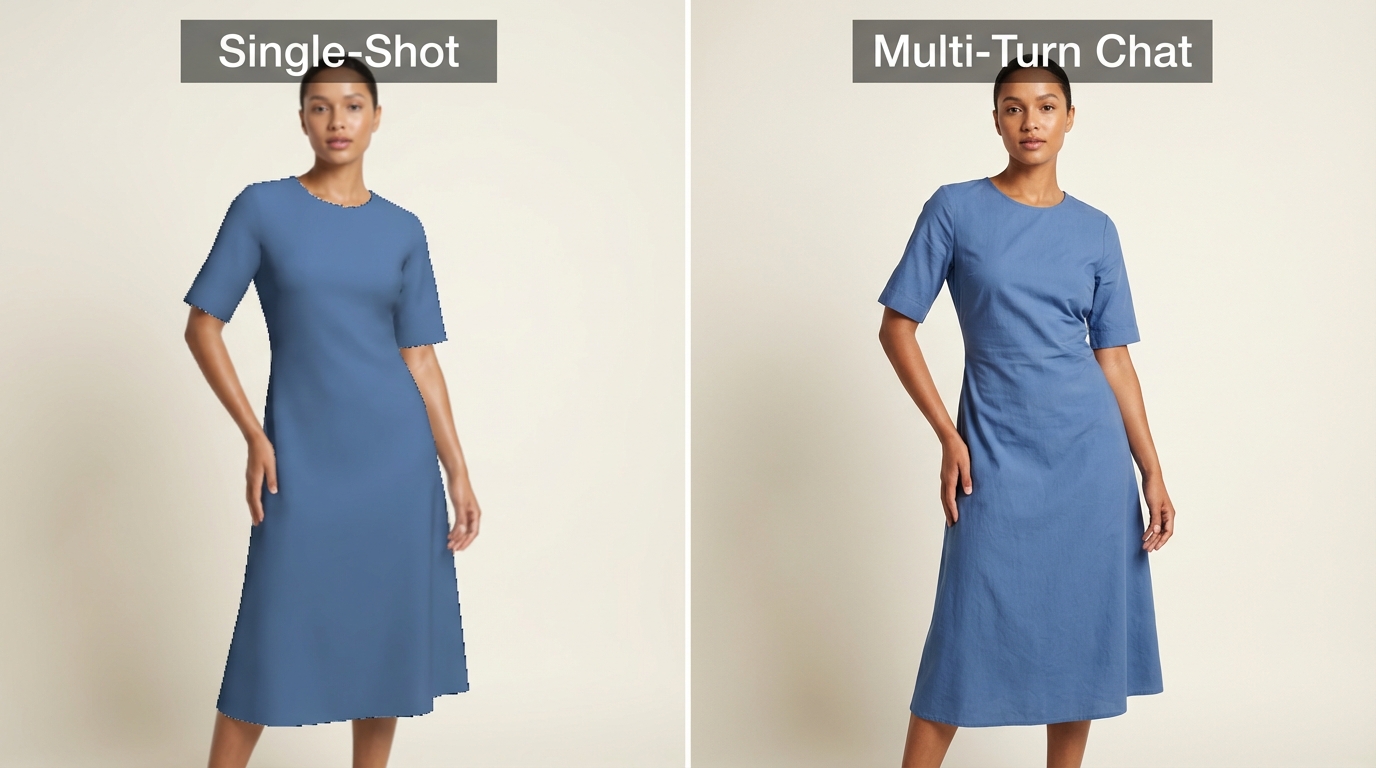
The practical impact becomes clear in a real 4-round session for a clothing product:
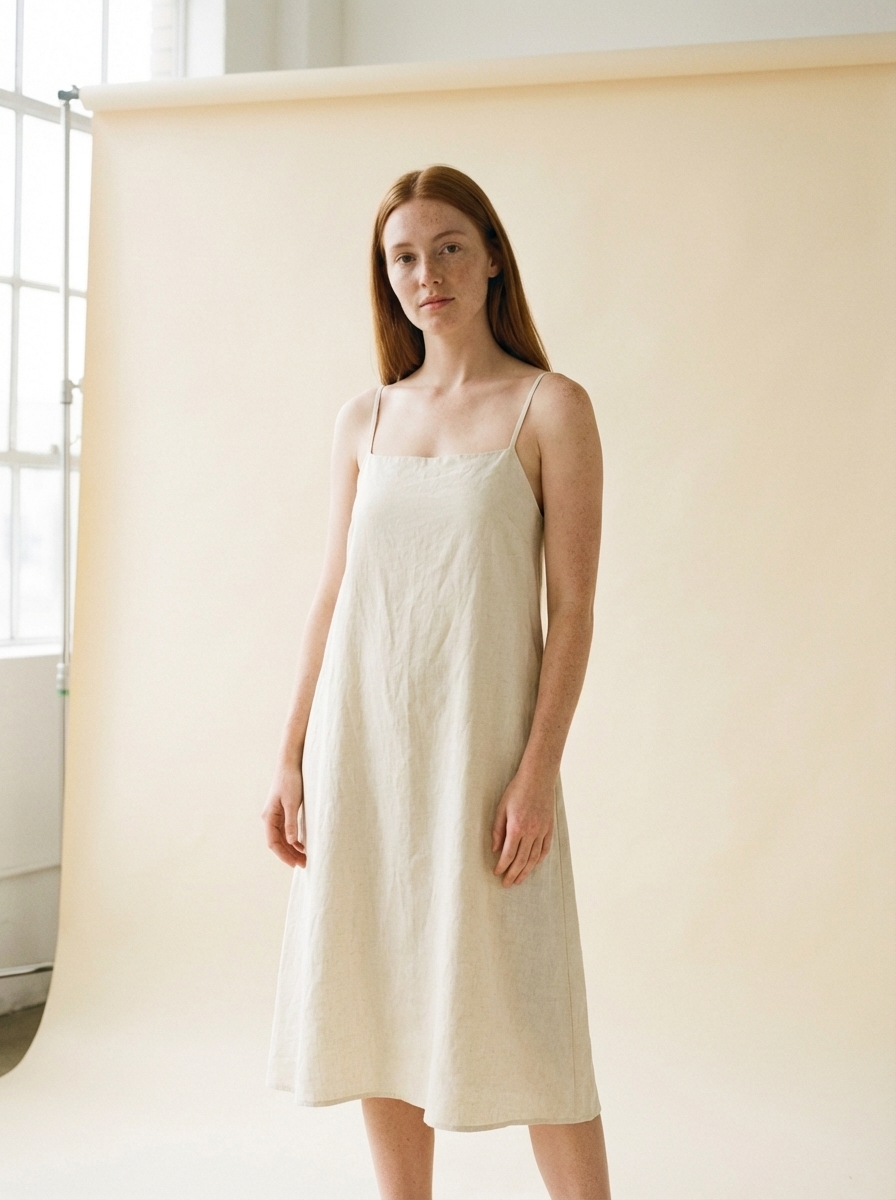
Round 1: Upload a product photo of a linen summer dress. Message: “Generate a model wearing this dress in a minimalist studio setting, soft directional lighting, neutral background.”
The AI generates an on-model image, preserving the dress’s color and silhouette from the reference photo.
Round 2: “Change the background to an outdoor café terrace, golden hour light.”
The AI updates the scene while holding everything else constant — same model, same dress, same pose, only the environment and lighting shift.
Round 3: “Make the model’s pose more relaxed and natural, left hand resting on the table.”
The pose adjusts. The dress still reads identically. The café setting is maintained.
Round 4: “Perfect. Now generate a 4K version for the listing hero image.”
Resolution scales up on the approved composition.
This four-step sequence would require four complete re-uploads and re-prompts in a single-shot tool, with no guarantee that the model, dress, or scene would remain consistent between attempts. In a chat-based virtual try on flow, each refinement takes seconds. The AI fashion model treatment — where the product is placed on a realistic AI fashion model in a coherent scene — reaches publishable quality in one focused session rather than through fragmented trial and error. The same approach works when you virtual try on clothes, shoes, glasses, or jewelry — the virtual fitting room is the conversation itself.
Context preservation is the key mechanism. When you say “more natural pose,” the system knows which model, which product, which scene you mean. You don’t have to re-describe the dress. You don’t have to re-upload the reference. The conversation is the workspace.
The 3-Stage Generation Method: Fixing the “Fake Look”
The most common failure mode in AI virtual try on isn’t low resolution or wrong colors — it’s the garment-to-body blending problem. When AI tries to do too much in a single pass — generate a model, place a garment, render a background, simulate lighting — the integration between the garment and the body tends to break down. Fabric wrinkle patterns don’t follow the body’s pose. Edge blending is too smooth in places where clothing has structure. The result reads as digital manipulation rather than a real photograph.
The 3-Stage Method addresses this by separating the generation problem into three distinct tasks, each of which AI handles reliably on its own.
Stage 1: Generate the background and scene independently.
Prompt example: “A minimalist studio backdrop, warm off-white seamless paper, soft window light from camera left, no people, photographic quality.”
This produces a clean, realistic environment — a scene that would plausibly exist without any product in it. The lighting is established. The depth of field is set. The color palette is locked.
Stage 2: Generate the model with proper pose and lighting to match the scene.
Prompt example: “A female model, standing, three-quarter pose facing camera, arms relaxed at sides, wearing a simple fitted white base layer, lit to match the warm studio light from the previous scene.”
Here the model is generated to fit the environment already established. Pose and lighting are optimized before any product is introduced.
Stage 3: Composite the real product onto the model.
This is where the product reference image becomes critical. Upload your actual product photo. Prompt example: “Dress this model in the attached linen dress [reference image]. Preserve the exact fabric color, button placement, and hemline from the reference. Match the existing studio lighting.”
The result: the garment is placed on a model whose pose was chosen to display it well, in a scene whose lighting was set to flatter it — rather than asking AI to solve all three problems simultaneously.
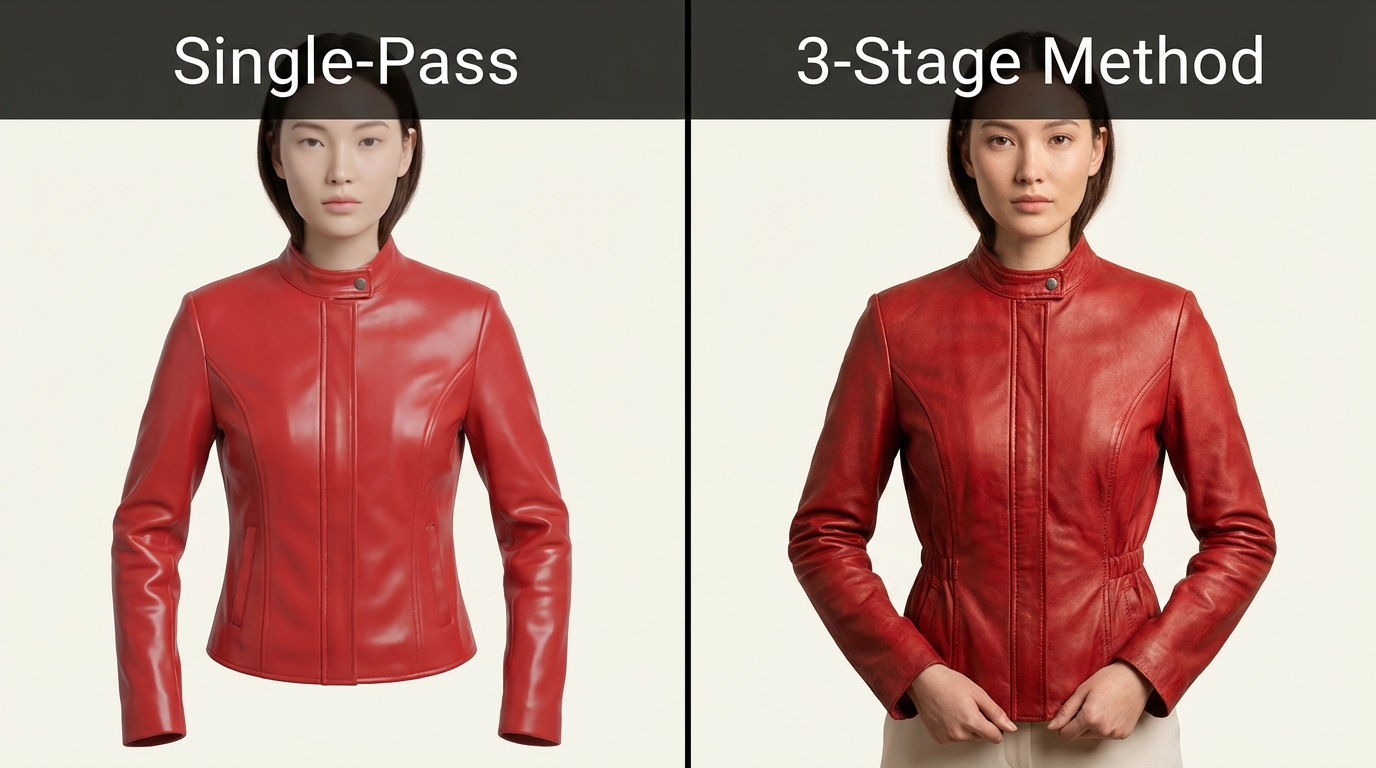
The Golden Rule of AI product imagery: AI generates the scene and the model; the product itself should remain a real photo to preserve texture and material authenticity. This principle prevents the AI from “inventing” fabric texture, luster, or color that diverges from your actual product.
Product Anchoring × Multi-Skin-Tone Display
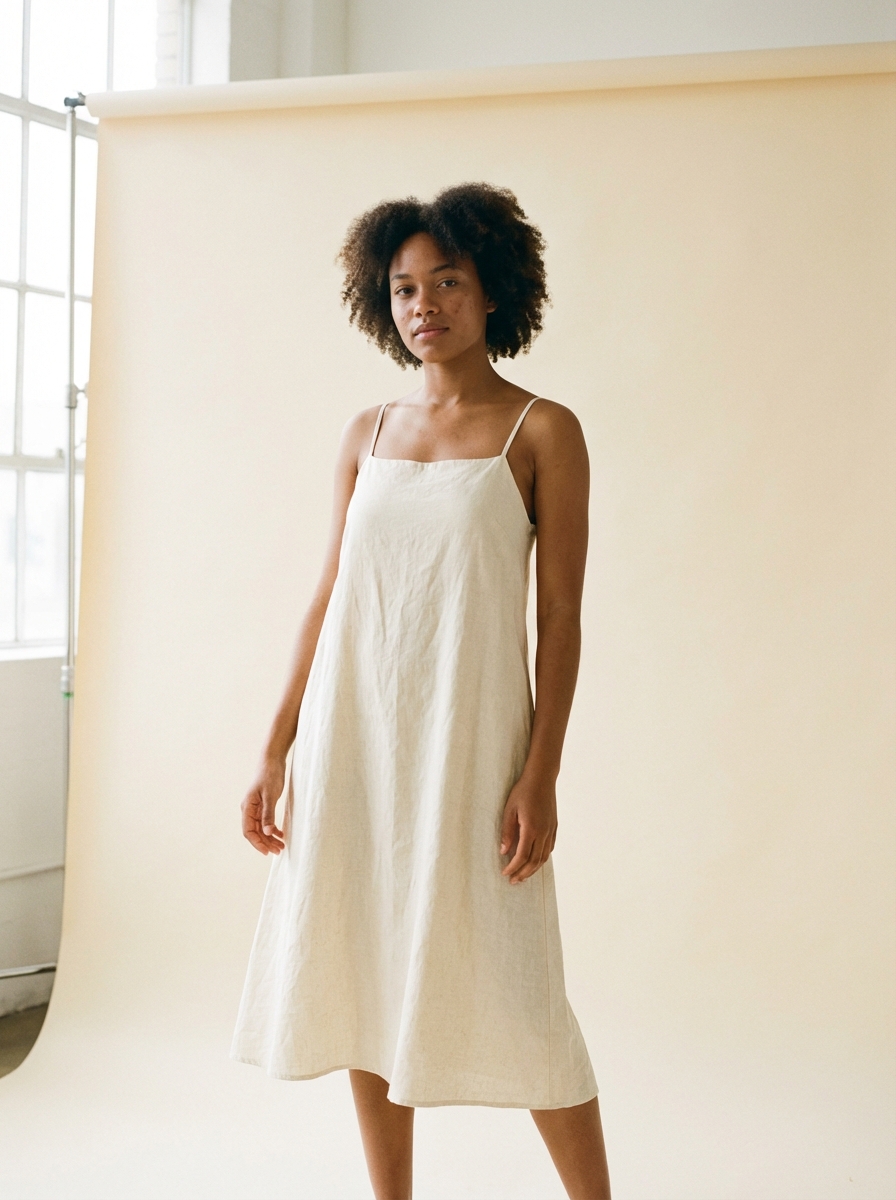
One of the most commercially useful applications of this method is generating the same product on multiple models with different skin tones, with the product appearance locked to the original reference photo throughout.
The technique: after completing Stage 3 for the first model, pass the same product reference into new sessions targeting different model demographics. The reference image acts as an anchor — AI cannot freely reimagine the product because it’s constrained to match the reference.
The business result is a complete set of diverse model images from a single product shoot, without any additional physical inventory or model bookings:
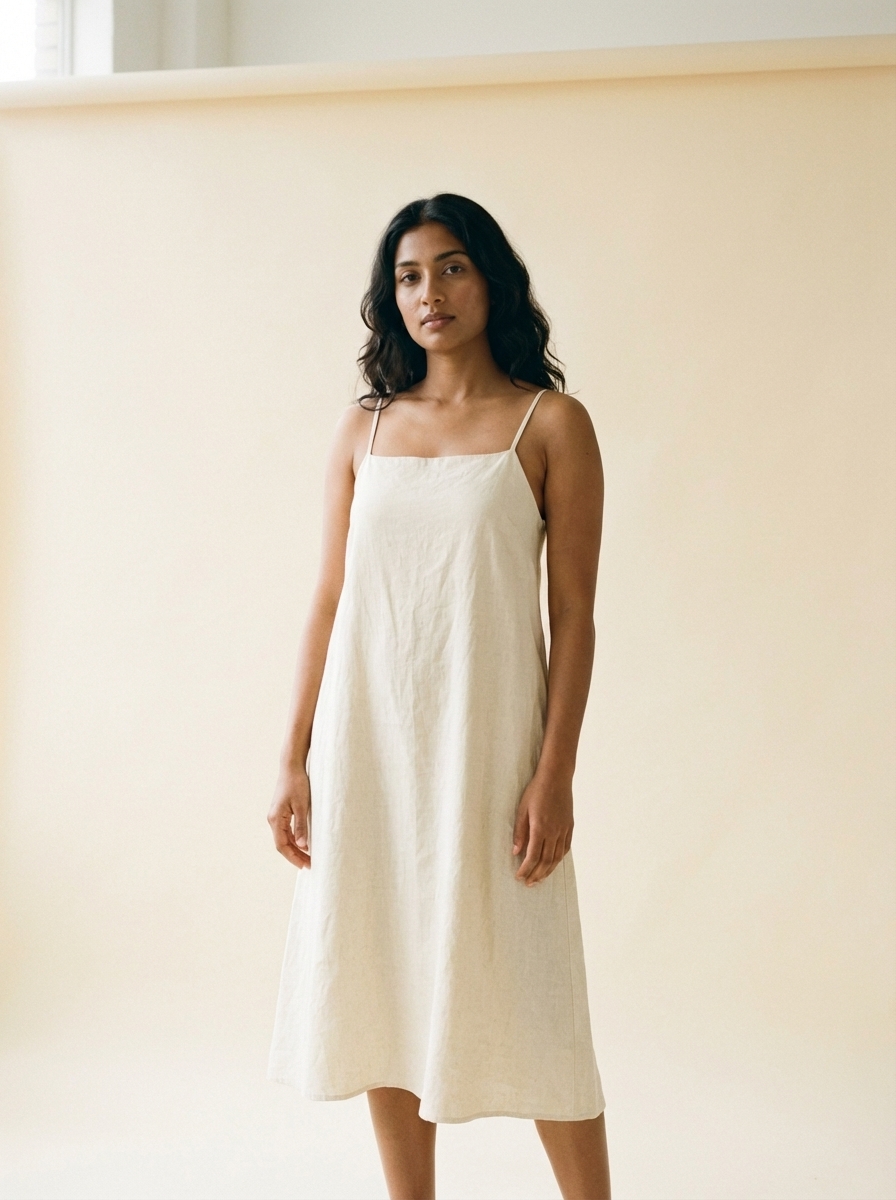
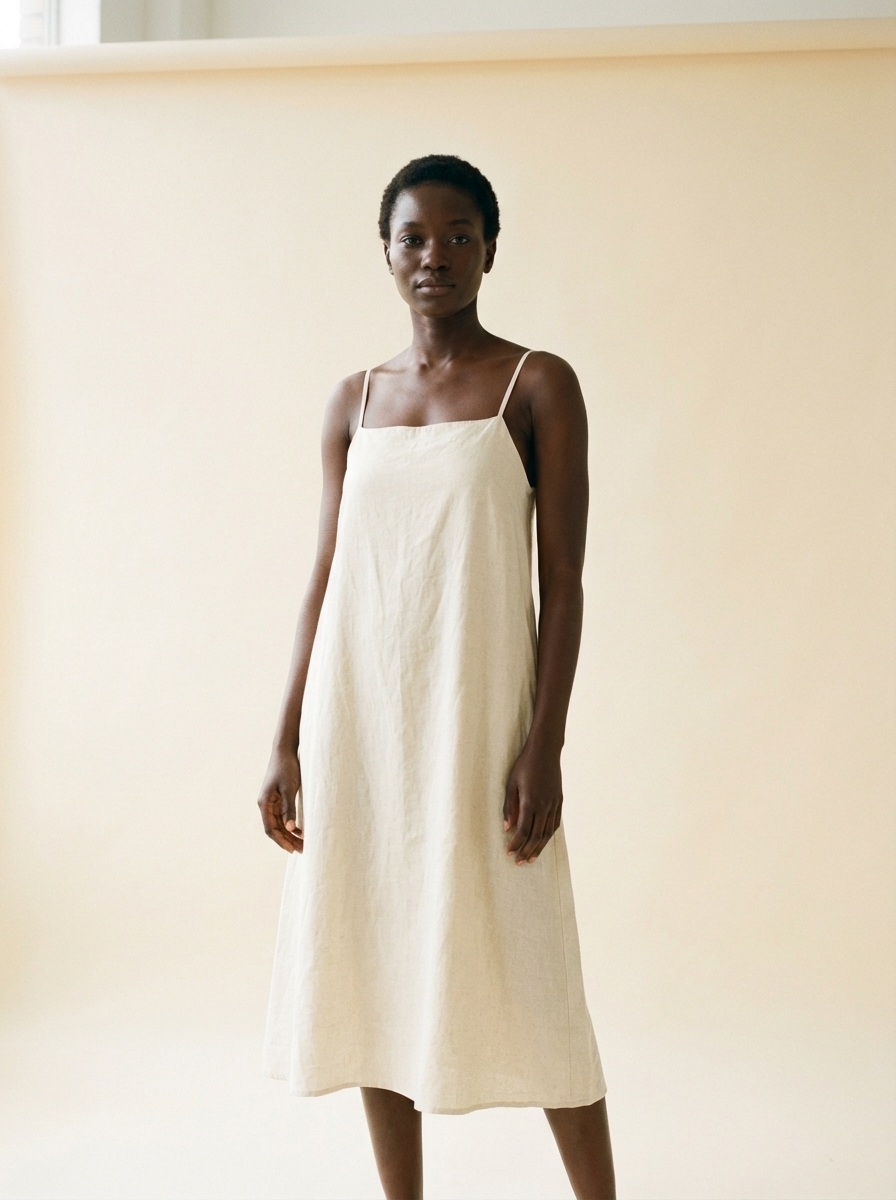
Each image shows the same product. The color, construction, and material read identically across all three. What varies is the model — which is exactly the kind of inclusive product gallery that high-performing DTC brands invest in at significant cost.
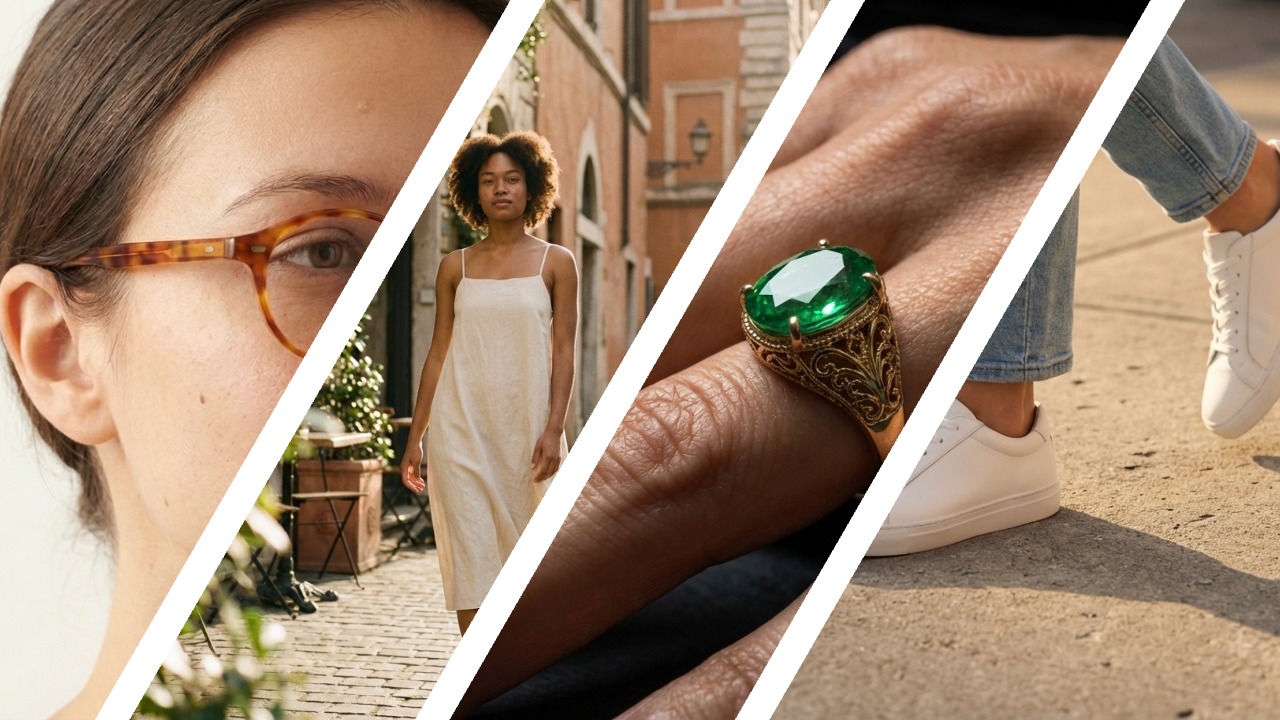
Cross-Category Results: Clothing, Jewelry, Glasses, and Shoes
Most virtual try on tools are built for a single product category. A chat-based virtual fitting room handles all of them — virtual try on clothes, virtual try on jewelry, virtual try on glasses, virtual try on shoes — using the same core workflow. Upload a reference, describe the scene, refine through conversation. The prompt conventions shift by category, but the approach stays consistent.
Clothing & Fashion
On-model shots are the highest-volume use case when sellers virtual try on clothes for e-commerce listings. The common deliverables: a hero front shot, a detail or texture shot, and a lifestyle scene.
Front full-body studio shot — Clean background, model standing, garment fully visible. Prompt: “Female model, front-facing, standing pose, neutral studio background, soft even lighting, the garment fills 60% of the frame height.”
Side half-body for texture — Angled to show fabric behavior and drape. Prompt: “Three-quarter angle, waist-up crop, afternoon window light, focus on fabric texture and how the garment moves at the hip.”
Outdoor lifestyle shot — Scene-based, editorial in tone. Prompt: “Urban street setting, cobblestone sidewalk, natural daylight, model mid-stride, relaxed and confident, magazine editorial style.”

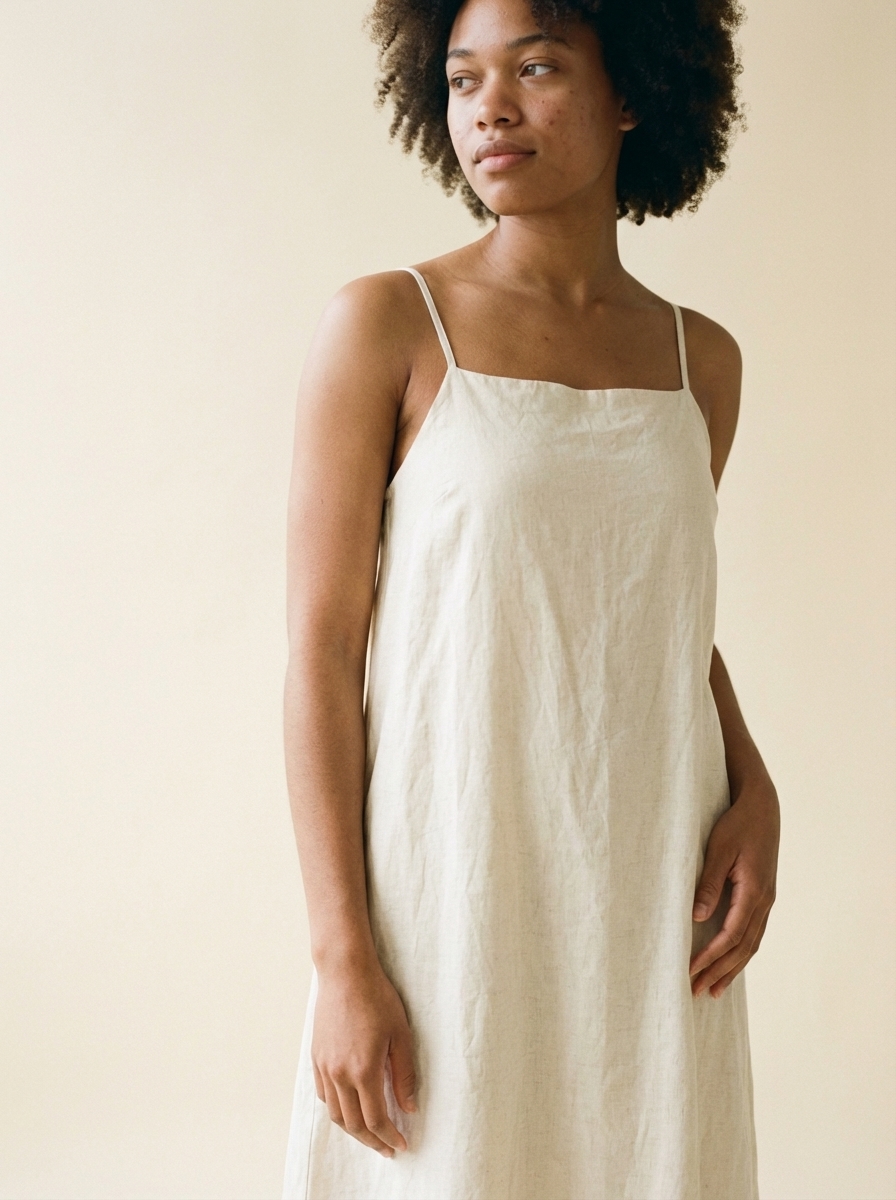
Tip: Always include your product photo as a reference image, even for lifestyle shots. When you virtual try on clothes without a visual anchor, AI will generate a generic garment that approximates your description rather than matching your actual product’s color, print, or construction. The reference image is what makes ai try on clothes results look like your actual product.
Jewelry & Accessories
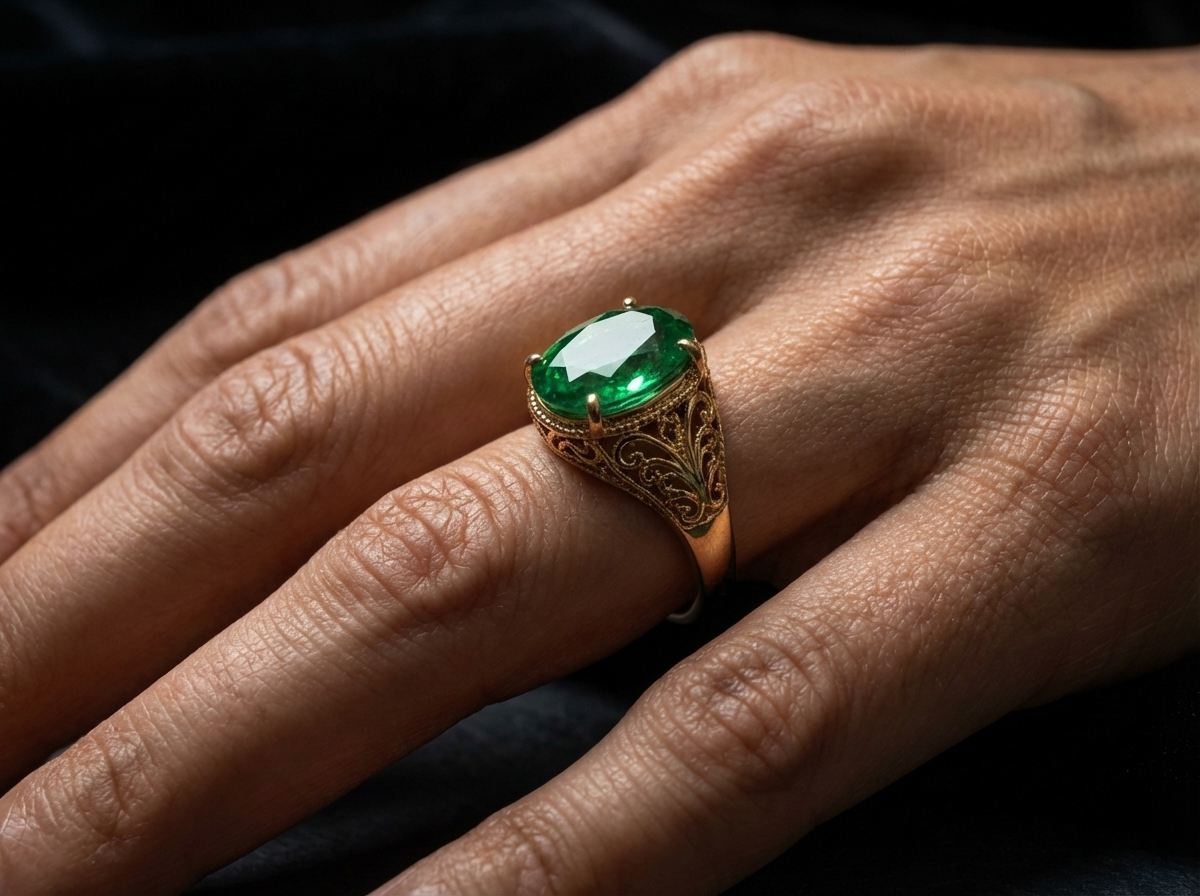
Virtual try on jewelry presents a different technical challenge from clothing: small items with high surface complexity. When you virtual try on earrings, rings, or necklaces, every facet and reflection matters. Rings need to show facets. Virtual try on earrings demands accurate drop and movement. Necklaces need to show how they lay against the collarbone.
Top-down for gemstone detail — Prompt: “Model’s hand resting flat, ring finger wearing the attached ring [reference], dark moody slate background, dramatic side lighting, macro-style focus on the gemstone, natural skin tone.”
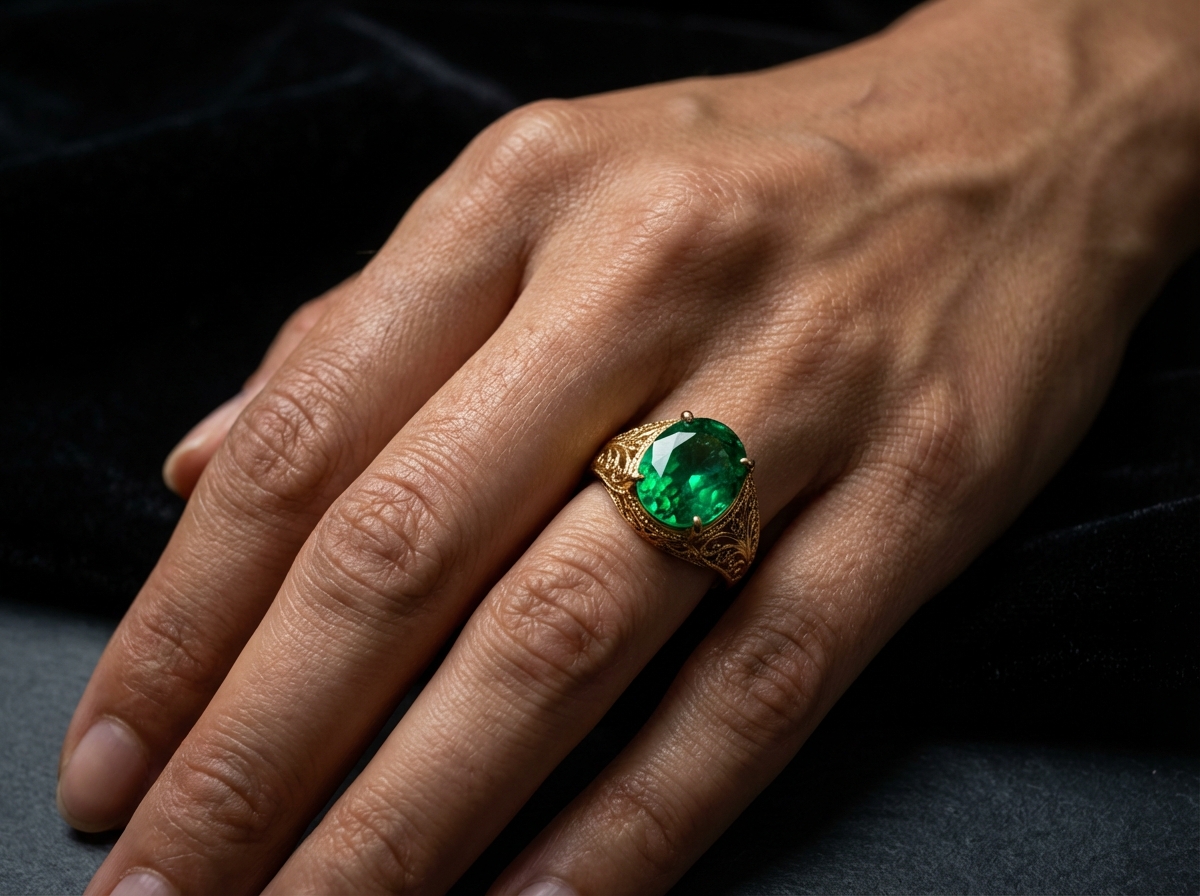
Side angle for band profile — Prompt: “Model’s hand at three-quarter angle, the attached ring [reference] visible from the side showing band thickness and filigree detail, soft backlighting, dark velvet background.”
Extreme close-up for facet detail — Prompt: “Extreme close-up of a model’s ring finger, wearing the attached ring [reference], 4K resolution, macro lens focus on emerald facets and gold prong detail, skin naturally lit.”
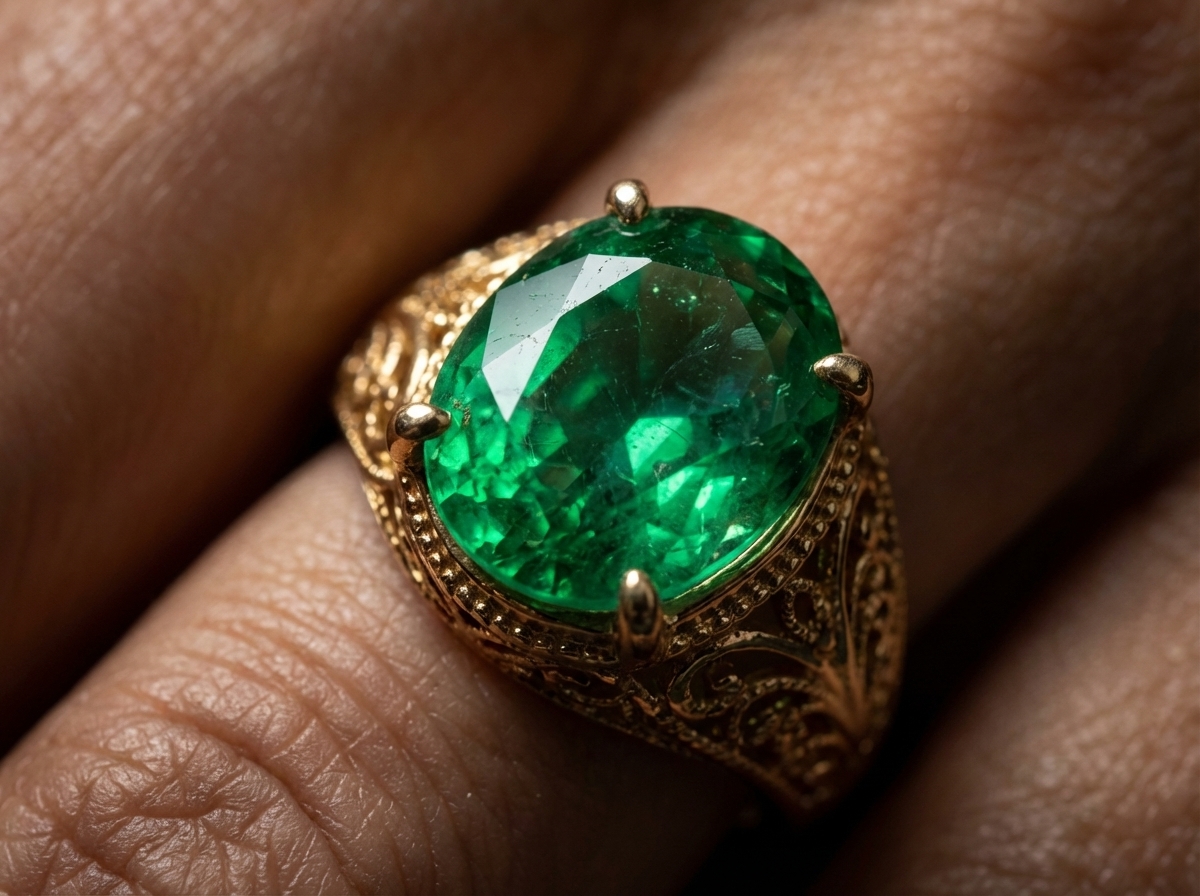
Tip: Virtual try on jewelry requires high resolution to avoid surface approximation artifacts. Always target 4K output when generating virtual try on jewelry images — this is non-negotiable for rings, earrings, and necklaces. Pay particular attention to luster — if the output shows flat or chalky surface finish where your product is metallic or gemstone-faceted, add “highly reflective surface, realistic specular highlights” to your prompt in a follow-up message.
Glasses & Eyewear
Virtual try on glasses involves a specific challenge that other categories don’t face: the frame must align precisely with the model’s facial structure. In any virtual try on glasses workflow, frames that appear to float off the face or temples that don’t make contact with the ear immediately read as AI-generated.
Front face view — Prompt: “Female model, front-facing, wearing the attached frames [reference], frames centered and level on the face, both temples making contact, natural expression, neutral background.”
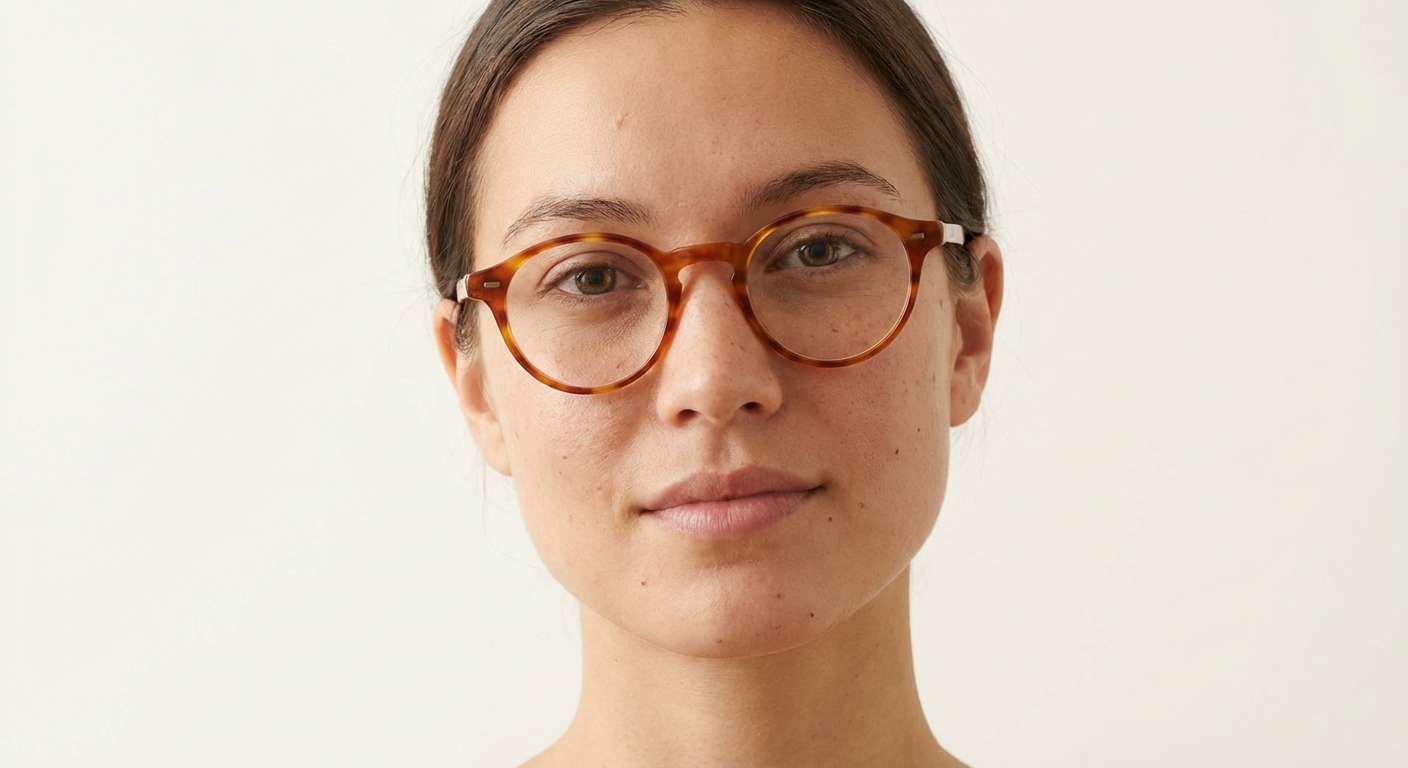
45-degree side profile — Prompt: “Model at 45-degree angle to camera, temple arms fully visible and resting correctly on the ear, the attached frames [reference] shown in profile, face lit from the front.”
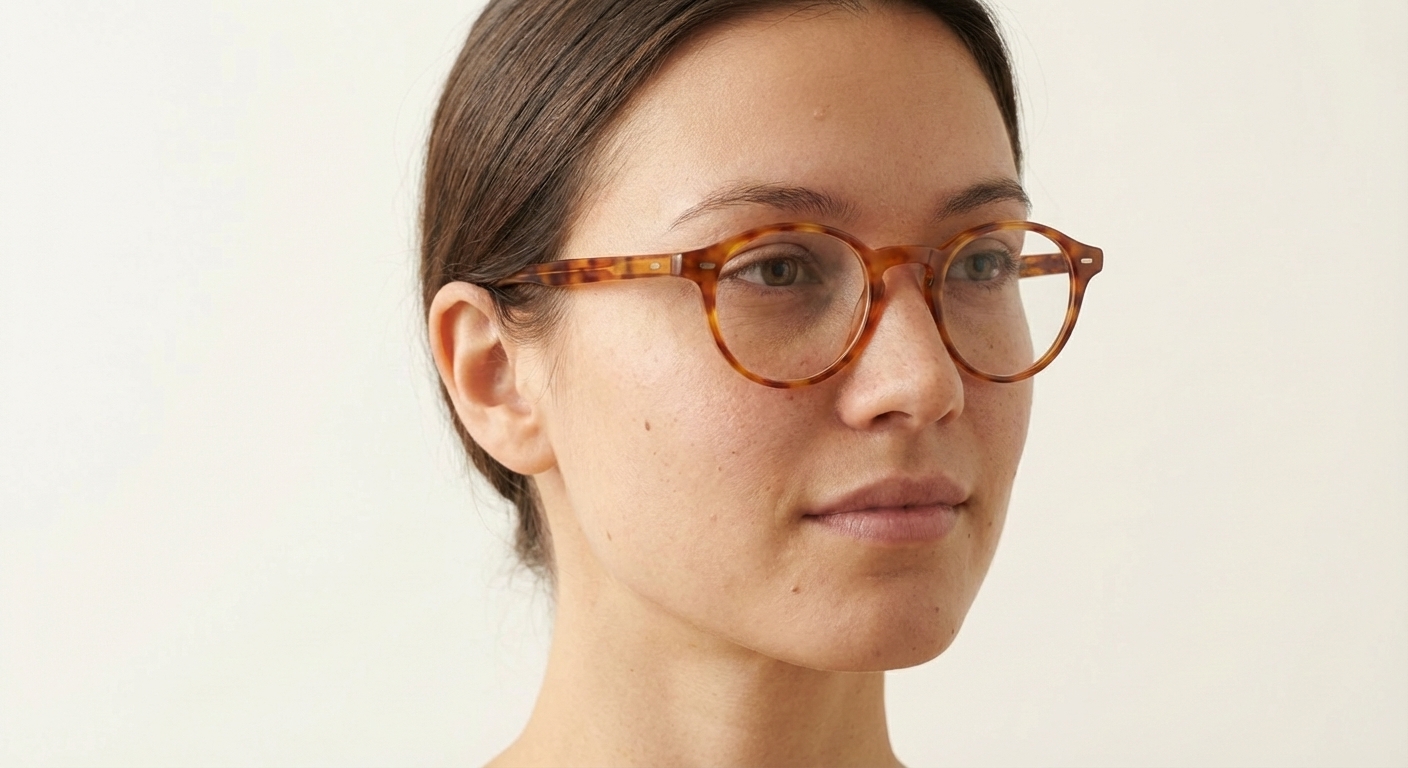
Low angle for proportion — Prompt: “Low camera angle looking slightly upward at the model, emphasizing the frame-to-face proportion relationship, the attached frames [reference] showing the bridge width relative to the nose, natural indoor lighting.”
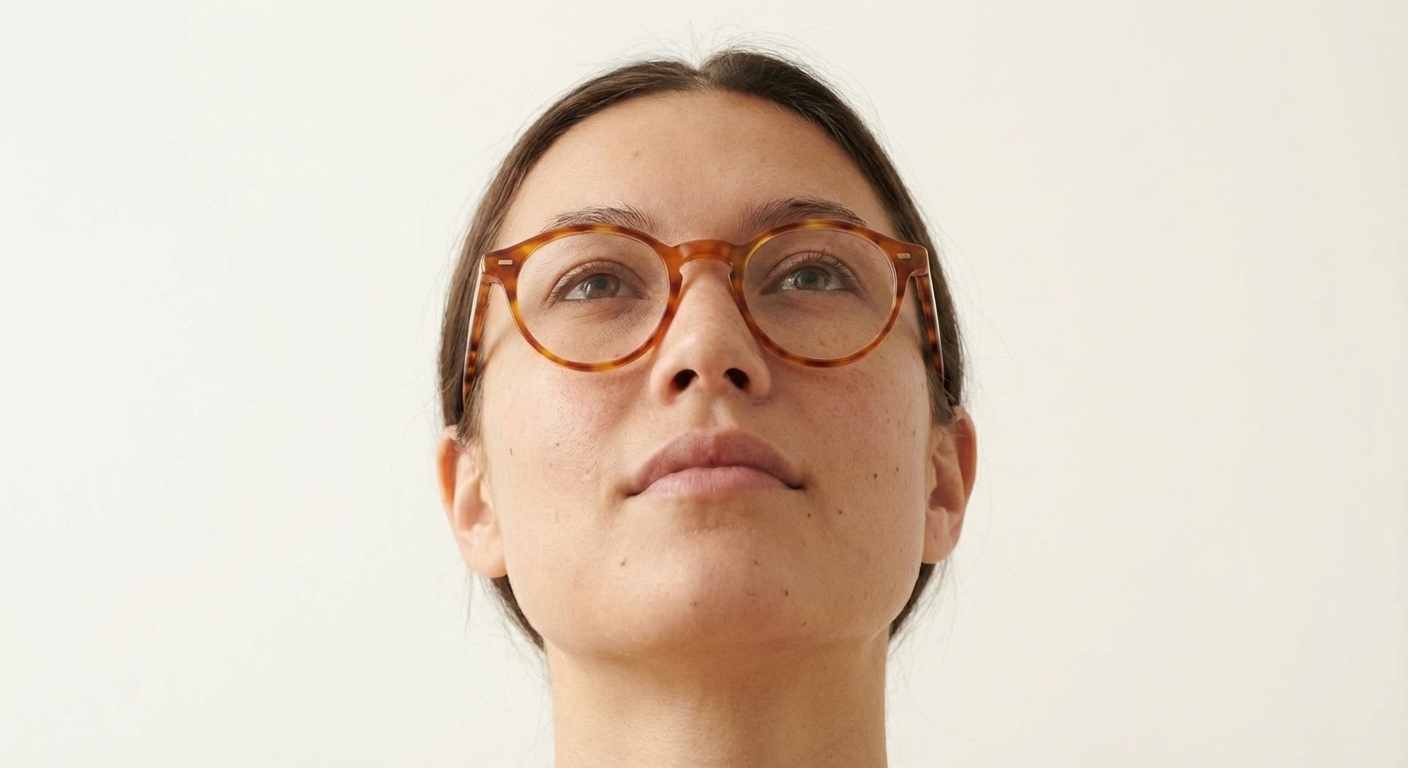
Tip: For virtual try on glasses, explicitly describe facial proportions in your model prompt before placing the frames. Prompt the model’s face shape and skin tone first, then attach the frames reference. This gives AI a stable face structure to anchor the frames against, reducing the floating-frame artifact. The same technique applies whether you virtual try on glasses with round frames, aviators, or oversized styles.
Shoes & Footwear
Virtual try on shoes requires attention to the shoe-ground relationship and how footwear interacts with the model’s full outfit. Generating virtual try on shoes images for product listings means every ground-contact detail matters — a shoe image where the model’s foot appears to hover or where the sole doesn’t cast a shadow breaks the realism.
Front standing view — Prompt: “Full-length shot, model standing on a clean light hardwood floor, the attached shoes [reference] on both feet, weight evenly distributed, subtle ground shadow, lower-body crop from mid-thigh down.”
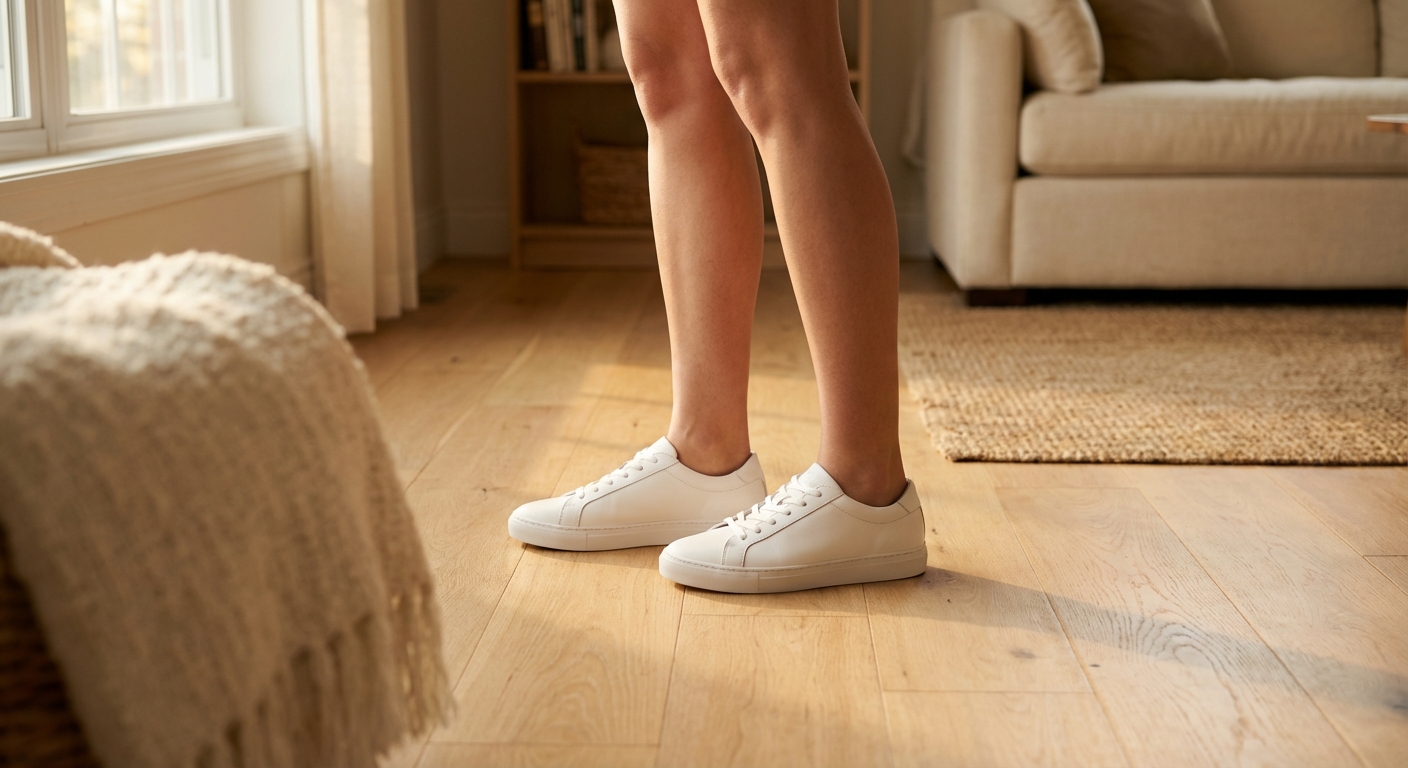
Side walking pose — Prompt: “Model mid-stride, dynamic walking pose, the attached shoes [reference] visible from the side, motion implied, natural outdoor concrete surface, shoe interacting naturally with the ground.”
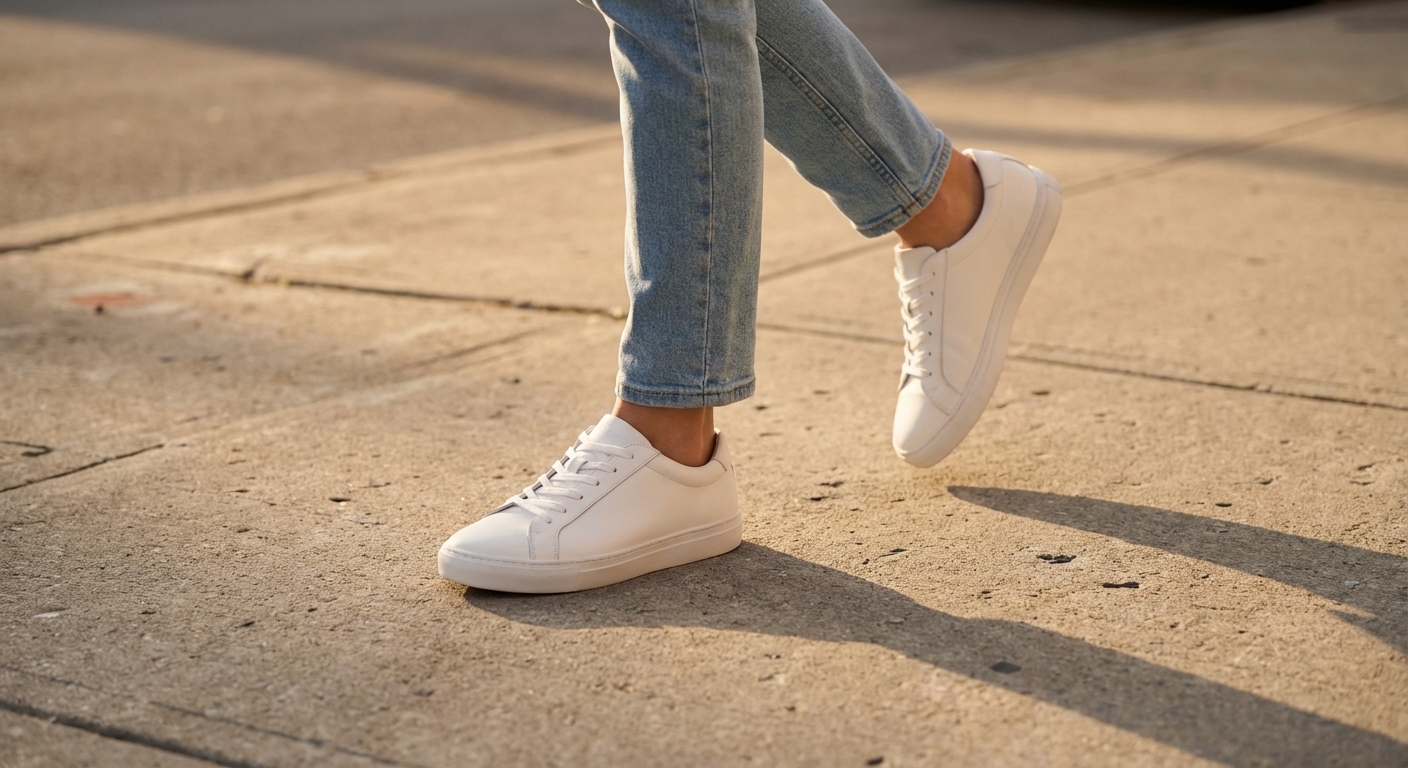
Overhead with outfit pairing — Prompt: “Top-down overhead shot, model seated, the attached shoes [reference] visible with an outfit pairing showing jeans and cuffed hem, styled flat-lay-style with human presence, natural light.”
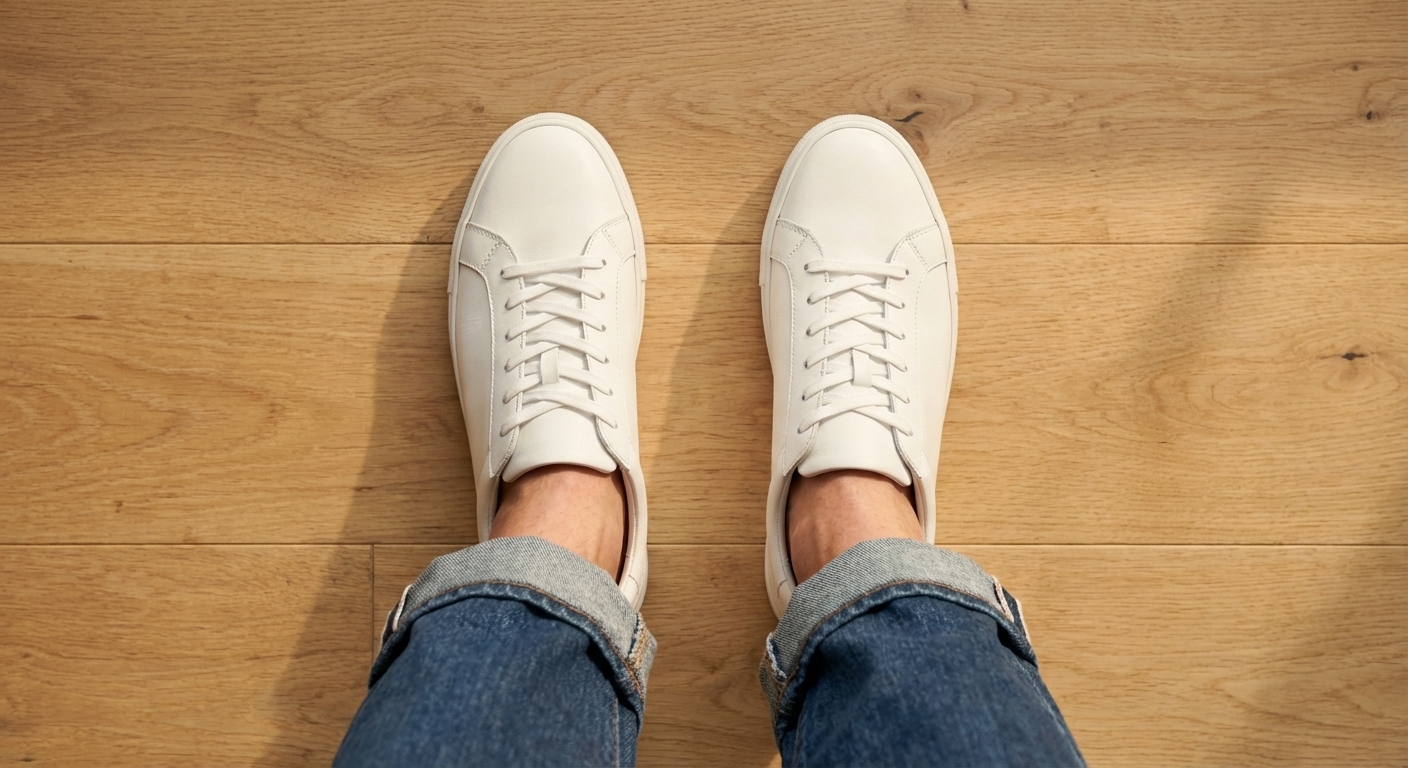
Tip: The shoe-ground intersection is the most common failure point when you virtual try on shoes with AI. Add explicit instructions about ground contact: “shoe sole making full contact with the floor” and “natural ground shadow under the shoe” in your prompt. Follow up in chat if the first output shows any floating or incorrect shadow placement.
For E-Commerce Sellers: Implementation Strategies
Knowing how to generate individual virtual try on images is one thing. Deploying AI virtual try on at catalog scale — across virtual try on clothes, jewelry, glasses, and shoes — requires a more structured approach.
Shopify vs Amazon: Two Different Visual Strategies
These platforms attract buyers in fundamentally different modes, which means your AI-generated images need different emphases depending on where they’ll be used.
Amazon is “Search Mode.” Shoppers arrive on Amazon with an item in mind. The main image needs to show the product clearly on a pure white background with no lifestyle elements — Amazon’s technical requirements enforce this. Supporting images should communicate specifications, dimensions, and features efficiently. Your virtual try on output for Amazon should prioritize clean, unambiguous on-model presentation with neutral backgrounds.
Shopify is “Discovery Mode.” Shoppers browse a DTC store without a specific purchase decision already made. Lifestyle imagery — showing the product in context, with emotional resonance — drives conversion. Your AI fashion model images for Shopify should include scene-based shots that communicate how the product fits into a buyer’s life, not just how it looks in isolation. Your Shopify store essentially becomes a virtual fitting room for every product in the catalog.
For specific prompt templates optimized for each platform, see the step-by-step guide for Amazon listing images and the complete Shopify product photography workflow.
Batch Workflow: From Single Item to SKU-Level Production
The recommended approach when starting with AI virtual try on — whether you’re testing virtual try on clothes for an apparel brand or virtual try on jewelry for an accessories line — is to run a single-item pilot before committing to catalog-level production.
- Select one product across 3–4 SKU variants (e.g., same shirt in four colors).
- Generate a full image set for one variant using the 3-Stage Method.
- Evaluate output quality and adjust your prompt templates.
- Scale the validated template across the remaining variants, swapping only the reference product image.
This gives you a repeatable prompt structure rather than recreating the workflow from scratch for each SKU.
Cross-Market Localization
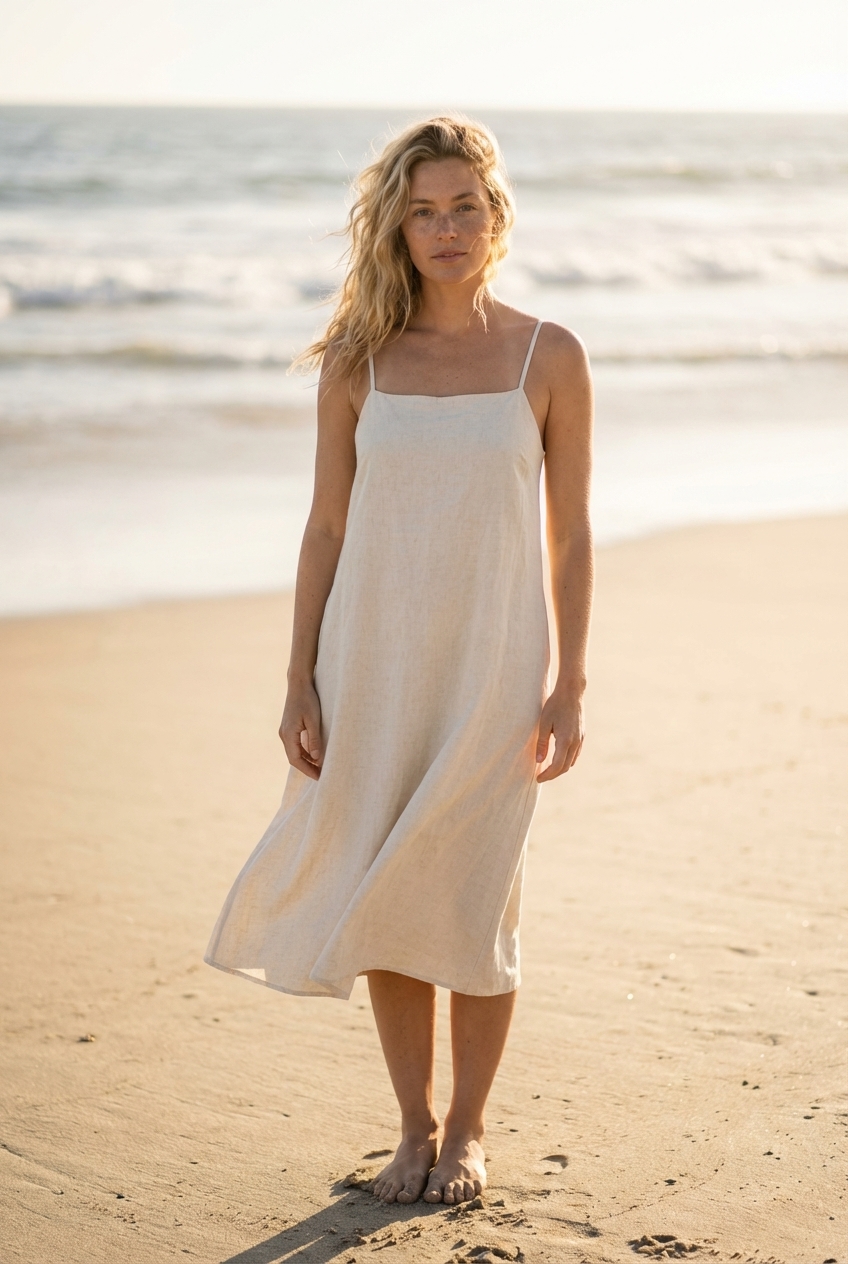
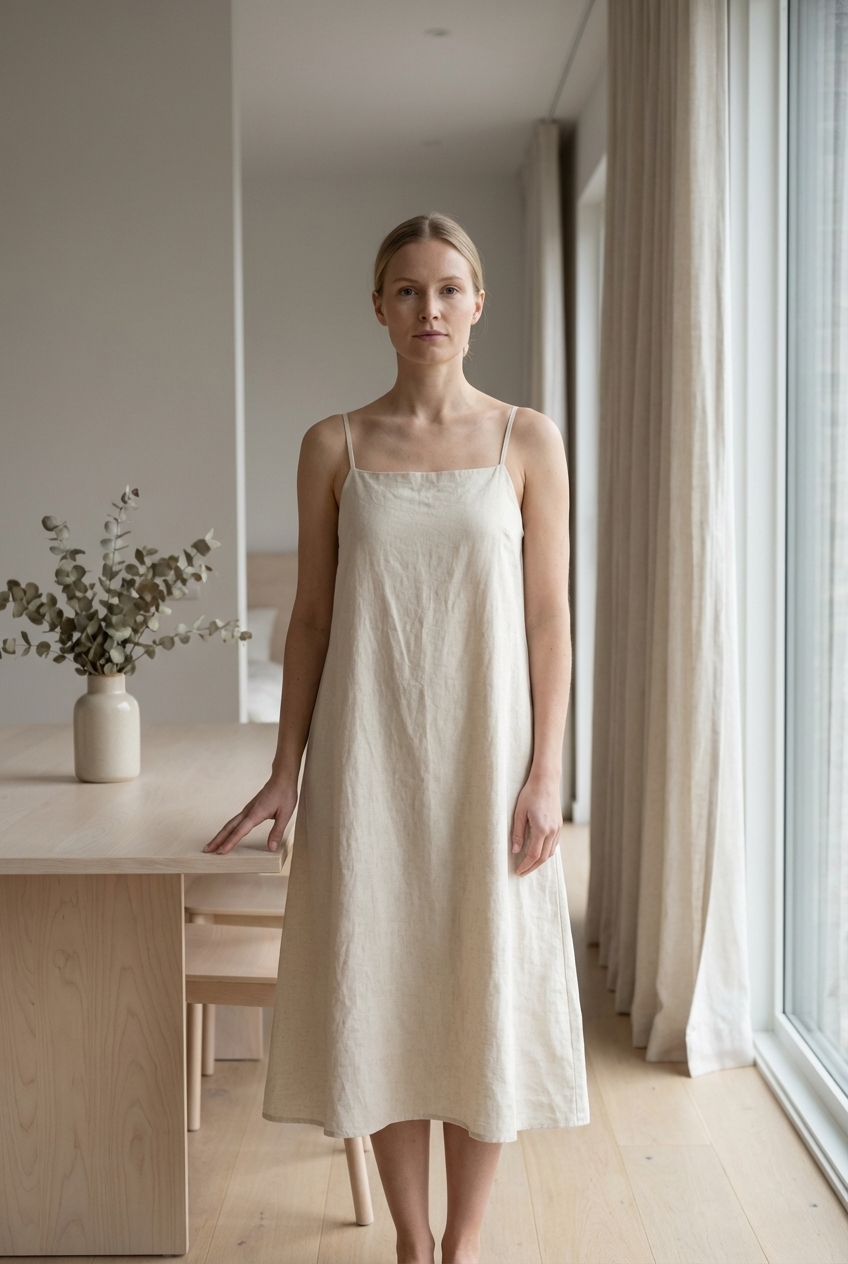
The same product can target dramatically different buyers across different markets — and the imagery that converts in each market reflects local aesthetics and aspirations. AI product photography with an AI fashion model makes localization feasible at scale. Each AI fashion model variant targets a different market demographic while keeping the product anchored to the original reference.
United States (California beach aesthetic):
Nordic market (minimalist interior):
Asian urban market (commute/transit setting):
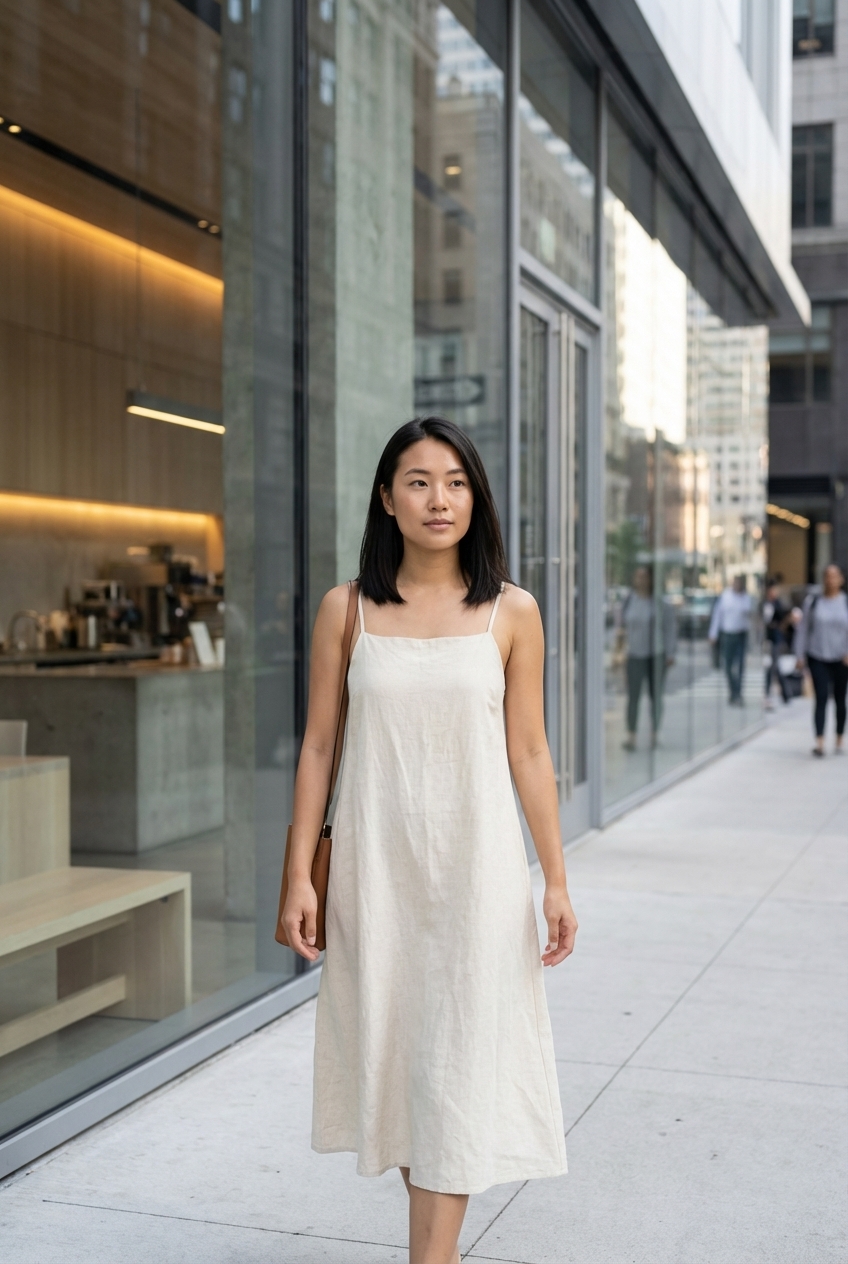
The product in each image is identical — same reference photo, same anchoring technique. What changes is the scene, the model, the styling, and the implicit cultural context. Three separate market-ready campaigns from a single product and a single chat session.
Cost Comparison: AI Virtual Try-On vs Traditional Photography
The cost advantage of AI virtual try on is real — whether you virtual try on clothes, jewelry, glasses, or accessories, the per-image cost stays within the same range. It’s worth breaking down precisely rather than rounding to a talking point.
| Traditional Photography | AI Virtual Try-On (Banana AI) | |
|---|---|---|
| 50 SKUs | ~$1,200 + 40 hours | ~$32 + 2 hours |
| Per image | ~$24 | $0.06–$0.40 |
| Turnaround | 3–5 days | Minutes |
| Physical samples | Required | Not required |
| Iterations | Reshoot = full cost | Free (just chat more) |
The per-image range of $0.06–$0.40 depends on model selection and resolution. Quick draft images at standard resolution sit at the lower end; 4K outputs from the highest-capability models approach the upper end. See Banana AI pricing for the current credit schedule.
ROI illustration: The Premium plan at $29.90/month includes 3,000 credits. At 5–20 credits per image depending on model and resolution, that translates to 150–600 publishable images per month. For a seller managing 50 active SKUs with 3 images each, a full catalog refresh costs under $30 — and can be regenerated whenever a product is updated, a season changes, or a new market is targeted.
The physical sample requirement is the less-discussed cost. Traditional photography requires finished product in hand — which means photography can’t begin until after production. A virtual fitting room powered by AI works from a product photo taken at any stage: prototype, sample, even a technical sketch with sufficient detail. Time-to-market compresses significantly.
Getting Started with AI Virtual Try-On
Whether you want to ai try on clothes for a product listing or test virtual try on glasses for a new frames collection, the workflow is designed to be accessible from the first session. No technical setup, no API integration required.
Step 1: Sign up at Banana AI — you receive 10 free credits with no credit card required. That’s enough for several draft images to evaluate quality against your specific product type.
Step 2: Upload your product photo in the chat interface and describe what you need. Start with a clear, specific scene: product type, model description, background, lighting. The more precise your initial prompt, the fewer refinement rounds needed.
Step 3: Refine through conversation — your chat session is now a virtual fitting room. Change the background. Adjust the pose. Request a different skin tone. Upscale to 4K. Each refinement is a single message — no re-uploading, no reconstructing context.
Model selection by use case:
- Quick drafts and batch previews: Nano Banana 2 — 7 credits per image, results in 4–6 seconds. Use for testing prompt templates before committing to high-resolution output.
- Final listing images and 4K output: Nano Banana Pro — 10–20 credits per image, full 4K capability, optimized for text legibility in product callout overlays.
- Choosing between models: See the detailed model comparison for a side-by-side quality and speed benchmark.
Start with 10 free credits — no commitment required. Run the dress through the 3-Stage Method. See whether the output meets your standard before making any decision about scale.
AI virtual try on is no longer a consumer novelty or a prototype technology. It’s a production tool that serious e-commerce sellers are using to cut photography costs by 95%, shrink turnaround from days to minutes, and generate diverse, market-specific content that traditional photography budgets couldn’t support. Multi-turn chat solves the iteration problem that single-shot tools never could. The 3-stage method solves the quality problem that single-pass generation consistently produces. Together, they make professional AI clothing model imagery — virtual try on clothes, virtual try on jewelry, virtual try on glasses, and virtual try on shoes — a repeatable, scalable workflow built around a single virtual fitting room. The starting point is Banana AI, 10 credits, and a product photo.