Nano Banana Pro Prompts for Amazon Product Photography
Generate a complete 7-image Amazon listing set with AI — with the reference image technique for cross-image product and typography consistency.
Professional amazon product photography used to cost $150 or more per image. A full 7-image Amazon listing set could run $1,000 or more. Nano Banana Pro changed everything. As an ai product image generator purpose-built for e-commerce, it produces listing-ready results in minutes. In this guide, we’ll share the exact nano banana pro prompts we use to create professional amazon listing images — a complete 7-image set — and the reference image technique that keeps your product looking identical across every single image.
What You’ll Learn
- How to write nano banana pro prompts that produce studio-quality ai product photos
- The “visual anchor” technique that locks your product’s appearance across all 7 images
- How to use Nano Banana’s reference image feature for consistent product placement in lifestyle scenes
- A typography baseline strategy so every graphic in your listing shares the same fonts and layout
- The dual-reference method for benefits, instructions, and comparison graphics
- All 7 prompt templates in copyable code blocks, ready to paste
Amazon Image Requirements Quick Reference
Before we dive into prompts, it helps to know what Amazon actually expects. Each image slot has a distinct job.
| Slot | Image Type | Purpose | Key Requirement |
|---|---|---|---|
| 1 | Primary | First impression, click-through | Pure white background, product fills 85%+ of frame |
| 2 | Lifestyle | Show the product in use | Realistic setting, target customer visible |
| 3 | Features | Highlight key product specs | Callout text, clean layout |
| 4 | Benefits | Emotional outcome, “why buy” | Atmospheric, aspirational feel |
| 5 | Instructions | How to use | Simple numbered steps |
| 6 | Comparison | Why you vs. competitors | Table or side-by-side format |
| 7 | Lifestyle 2 | Second use scenario or customer avatar | Different setting from slot 2 |
Amazon’s technical amazon image requirements are non-negotiable for the primary image: pure white background (RGB 255,255,255), minimum 1000×1000 pixels, and the product must fill at least 85% of the image area. The remaining six images have more creative freedom but should maintain consistent branding throughout.
Step 1: Your First Nano Banana Pro Prompt — The Primary Image Visual Anchor
The primary image is the foundation of your entire listing — and the first nano banana pro prompt you’ll write. More importantly for our workflow, it becomes the visual anchor — the reference image that every subsequent prompt will point back to. If this image isn’t perfect, inconsistencies will compound across all seven slots.
Here’s the prompt template:
Create a clean product photo rendering for [Your Product Name] for use as the primary image on an Amazon listing. The product should be on a pure white background with professional studio lighting. The product is [your visual anchor description — 2-3 sentences describing shape, materials, colors, and key design details].
The key is the visual anchor description. This 2-3 sentence block describes exactly what your product looks like — its shape, the material finish, the color palette, any distinguishing design details. You will reuse this exact description in your lifestyle prompts to reinforce product identity.
For example, a visual anchor description for a ceramic diffuser might read: “The diffuser is a matte white ceramic cylinder, approximately 12cm tall with a subtly tapered top, featuring a small circular LED ring around the base that glows soft amber. The surface has a smooth, slightly textured finish with no visible seams.”
Here’s the kind of result this nano banana pro prompt produces — studio-quality amazon product photography without a camera:
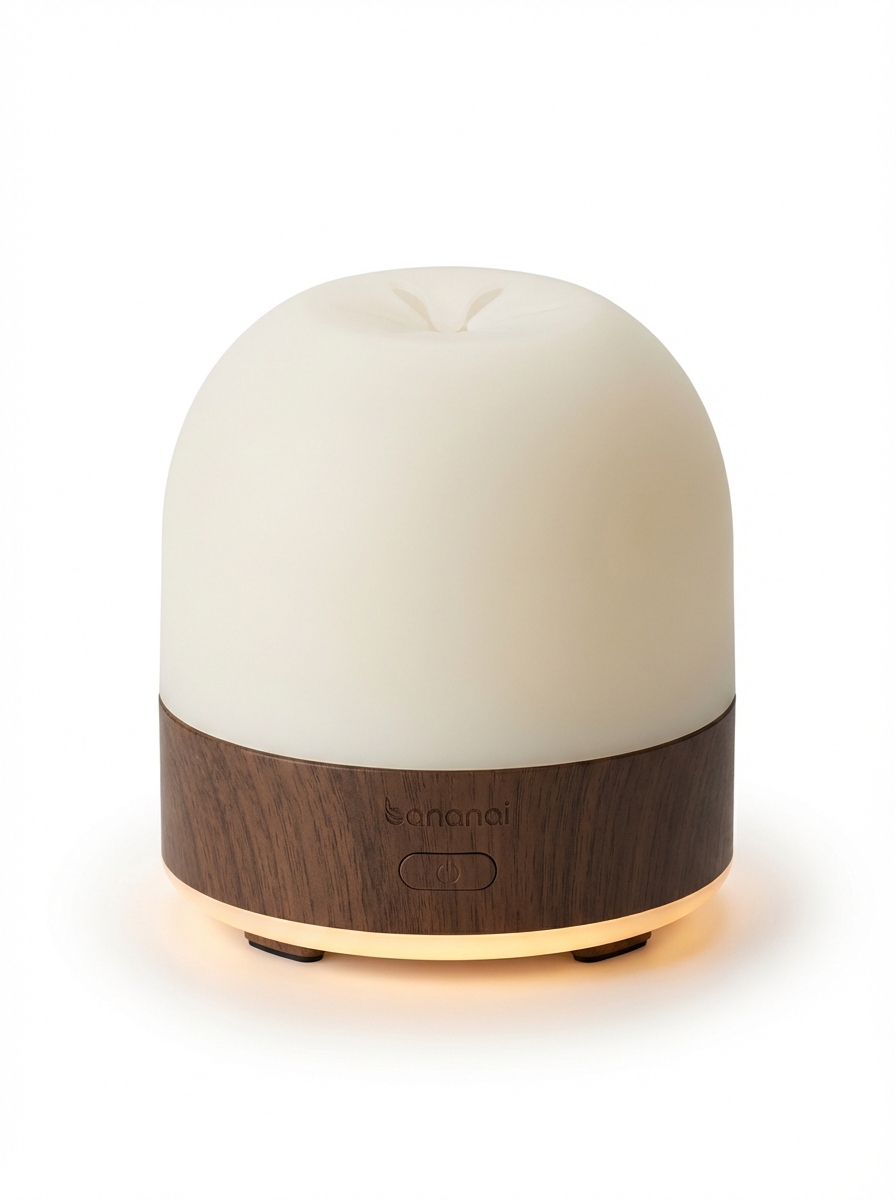
This image now becomes the product reference for every prompt that follows. The more precise your visual anchor description, the more consistent your entire listing will look.
Step 2: Nano Banana Pro Prompts for Lifestyle Images — The Reference Image Technique
This is where most sellers stumble. They generate a great primary image, then write a lifestyle prompt — and the product that appears looks vaguely different. Wrong proportions, different surface finish, slightly off color. It breaks trust with the buyer.
Nano Banana Pro solves this with reference images. You attach your primary image directly to the prompt, and add a Relationship Instruction that tells the model exactly what to do with it.
The formula is: [Reference attachment] + [Relationship Instruction] + [New Scenario]
Using the attached image as the exact product to feature — maintain its identical appearance. Create a lifestyle image for an Amazon listing showing this product with a [target customer avatar] in a [setting]. The product is [size], [scale reference] — it should appear at realistic scale relative to the furniture and person in the scene.
Two things to notice here. First, the Relationship Instruction is explicit: “maintain its identical appearance.” This tells Nano Banana Pro to treat the reference image as ground truth, not inspiration. Second, the scale reference — something like “roughly the size of a large grapefruit” or “about the height of a standard wine bottle” — prevents the AI from guessing at proportions. Without a scale reference, products often appear dramatically larger or smaller than they are in real life.
Google’s official prompting documentation covers the reference image mechanics in detail. Their Ultimate Nano Banana Prompting Guide is worth bookmarking — we’ll reference several of its techniques throughout this article.
Here’s what amazon product photography looks like when generated with this nano banana pro prompt technique:
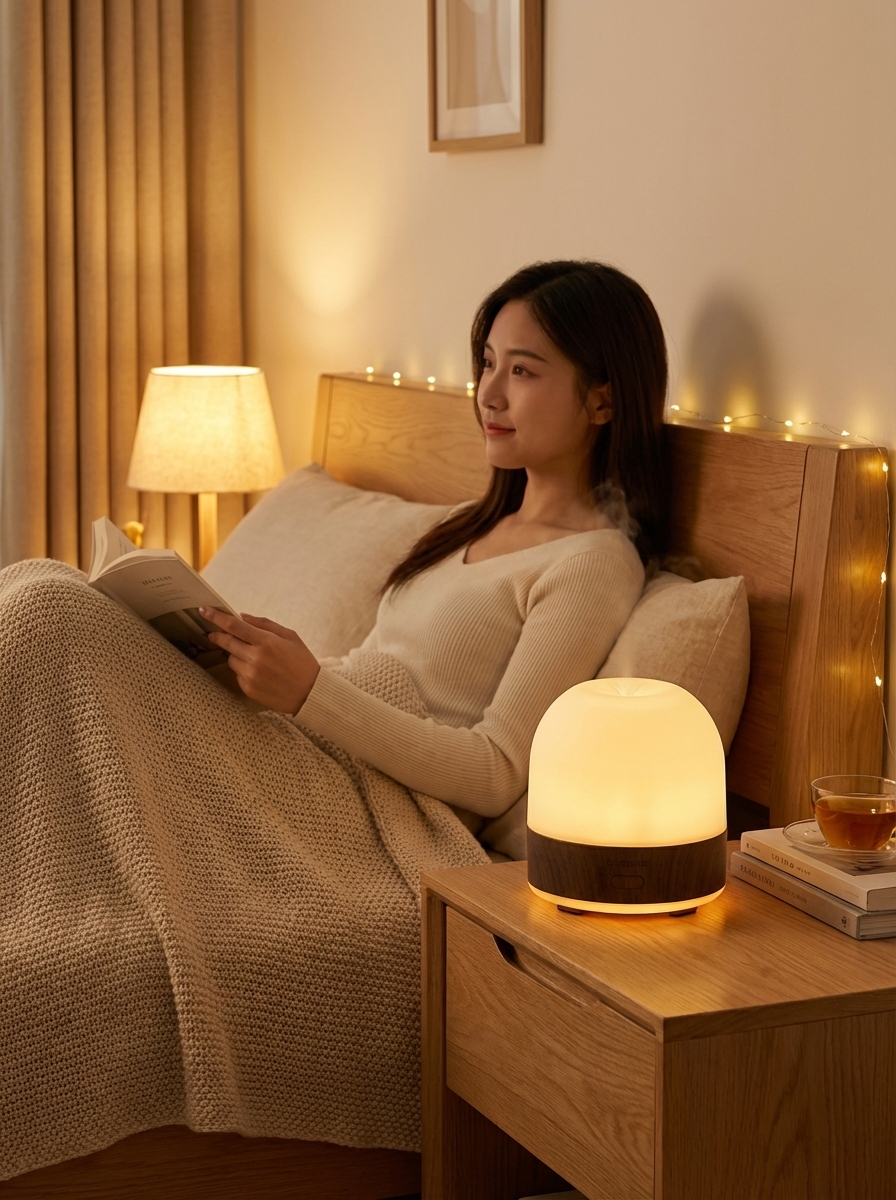
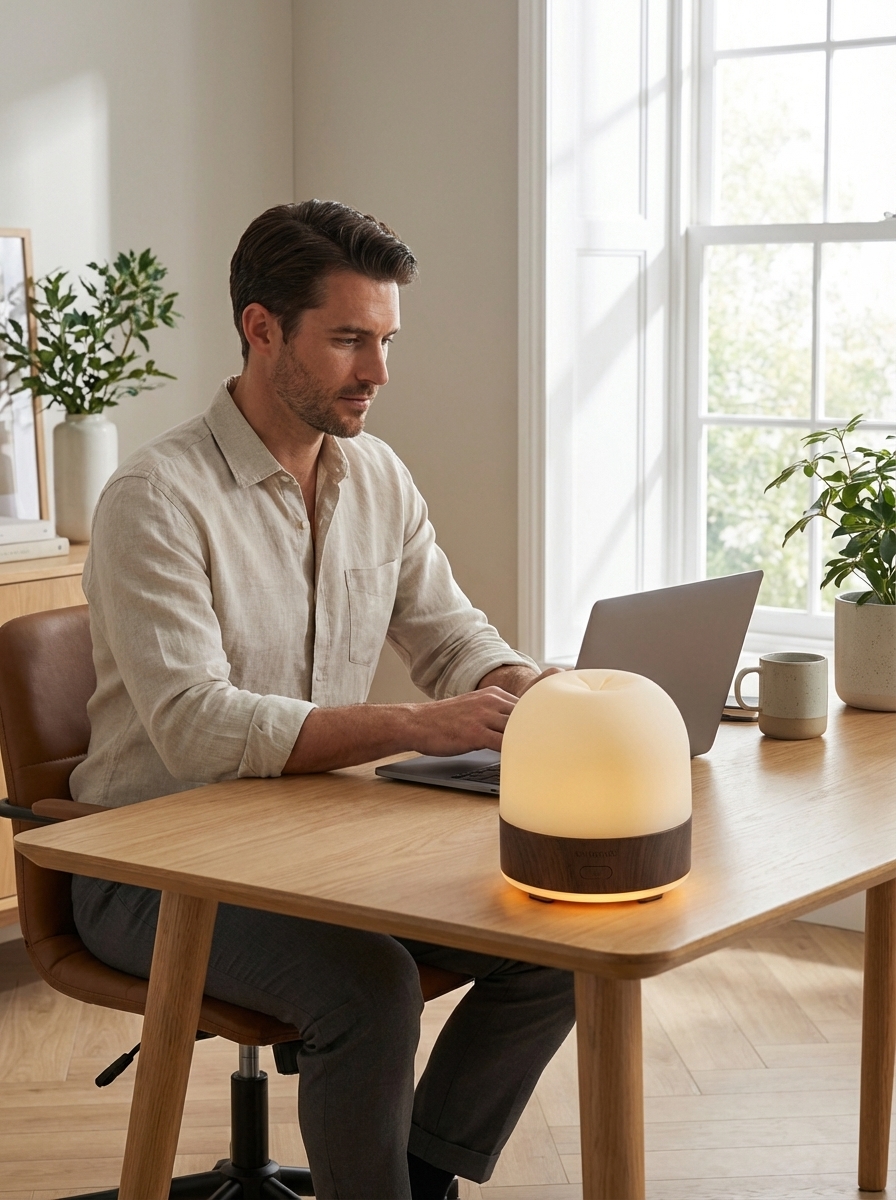
The product looks identical in both scenes, even though the settings — a cozy bedroom and a home office — are completely different. That’s the reference image technique working.
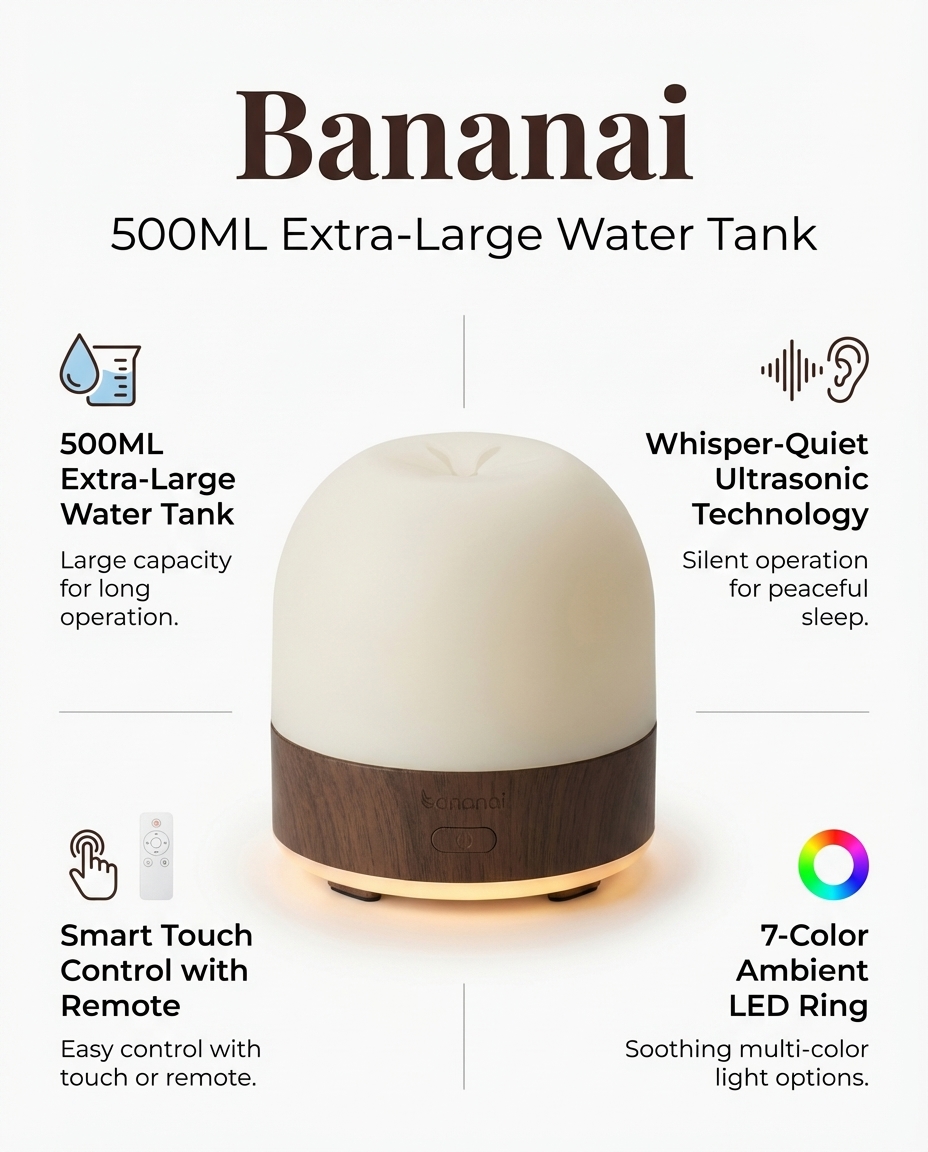
Step 3: Features Graphic — Establishing Your Typography Baseline
The features graphic is the first image in your listing that includes significant text. This makes it strategically important beyond just communicating specs: it establishes your typography baseline for every graphic that follows.
If you get your font choices, text hierarchy, and color palette right here, you can instruct all subsequent graphics to match this style — and your listing will look like it was designed by a professional studio rather than assembled from separate AI generations.
Here’s the prompt template:
Using the attached image as the exact product to feature — maintain its identical appearance. Make a clean aesthetic features graphic for an Amazon listing, optimized for mobile. Highlight: [feature 1], [feature 2], [feature 3], [feature 4]. Render the brand name '[Brand]' prominently at the top in a [font name] font, [color]. Subtitle text should use [subtitle font]. All body text should use [body font].
The typography instructions are explicit on purpose. Nano Banana Pro’s text rendering has improved substantially — Google’s prompting guide notes in the Text Rendering section that specifying exact font names (like “Playfair Display” or “Inter”) produces significantly better results than describing font styles abstractly. Name your fonts, name your colors, and name your hierarchy.
The result — clean, branded, mobile-optimized:
Save this image. You’ll attach it as a second reference in the next step.
Step 4: Dual-Reference Nano Banana Pro Prompts for Remaining Graphics
This is the technique that separates a polished Amazon listing from a generic one — and it’s the step most ai product image generators can’t replicate, because they don’t support reference images.
For your benefits, instructions, and comparison graphics, you attach two reference images: your primary product image and your features graphic. The product image enforces shape and appearance consistency. The features graphic enforces typography and layout consistency. Together, they give Nano Banana Pro a complete visual brief.
Here’s the dual-reference prompt template:
Using the attached images as references — first image is the exact product (maintain identical appearance), second image is the design style guide (match its typography, layout language, and color palette). Make a clean aesthetic [benefits/instructions/comparison] graphic for an Amazon listing, optimized for mobile. [Content specific to type]. Include the brand name '[Brand]' prominently.
There’s a practical benefit to having two reference images beyond consistency: you can write shorter prompts and get better results. When the visual language is already defined by the references, you don’t need to re-specify fonts, colors, and layout patterns in every prompt. You just describe the content — the four benefits, the three-step instructions, the comparison criteria — and let the model handle the presentation.
For atmospheric graphics like benefits, a short mood hint works well: “warm spa-like atmosphere with natural elements” gives the model just enough direction without over-constraining the composition.
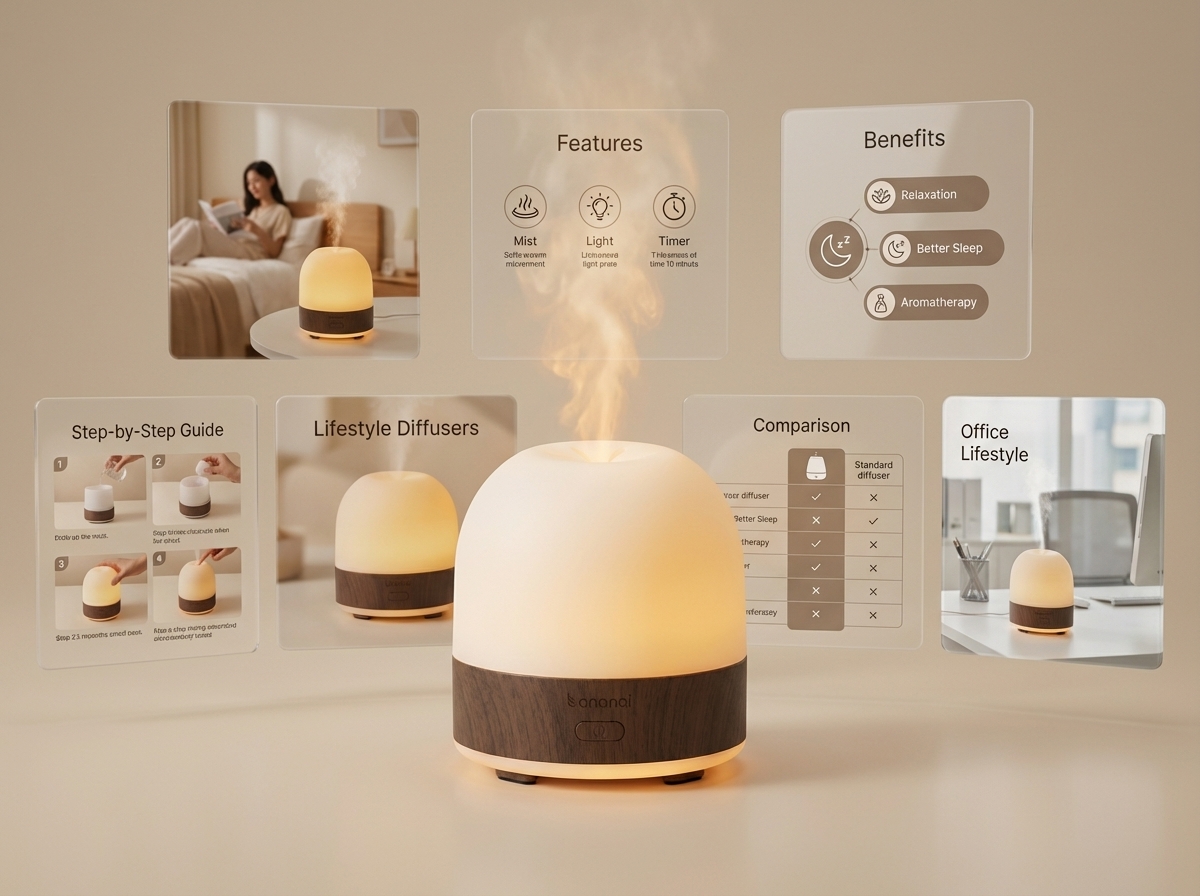
Here are the results:
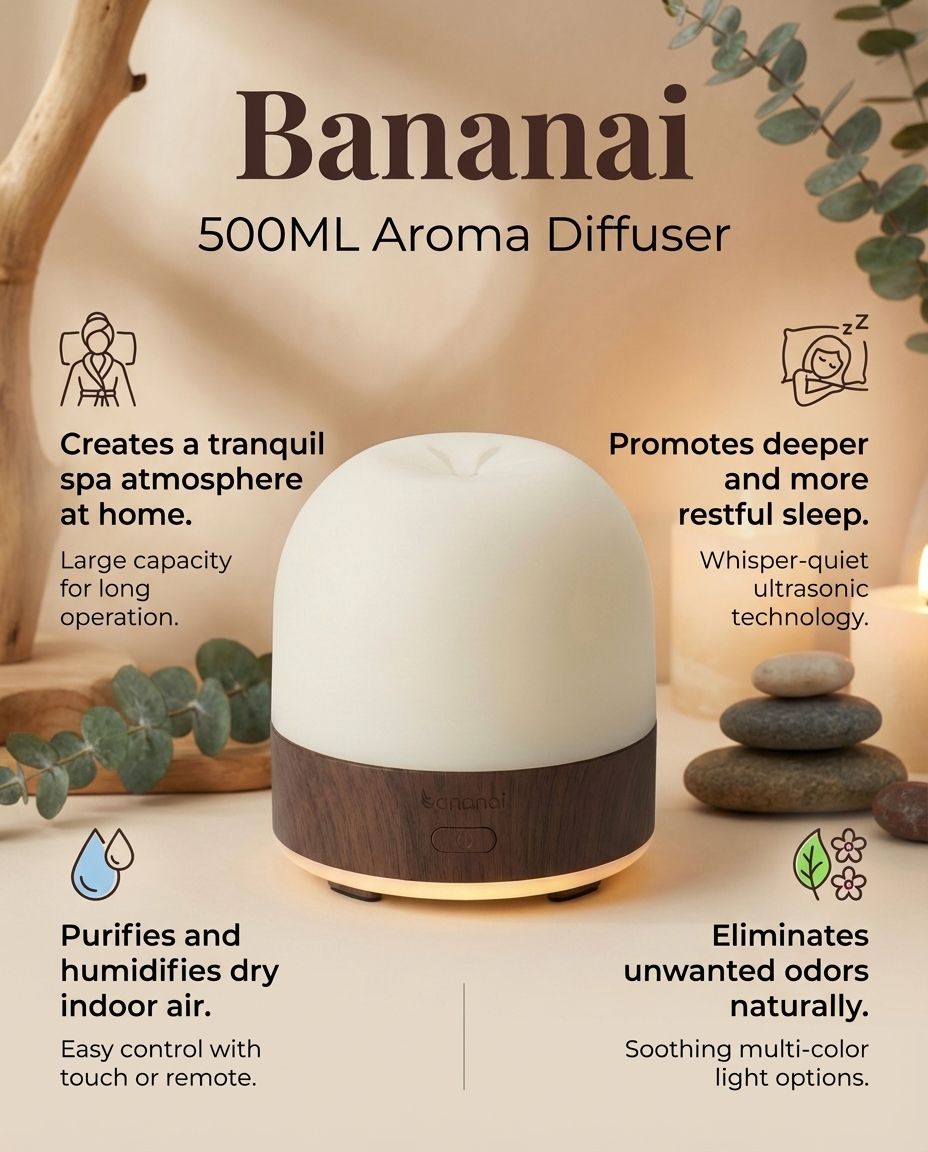
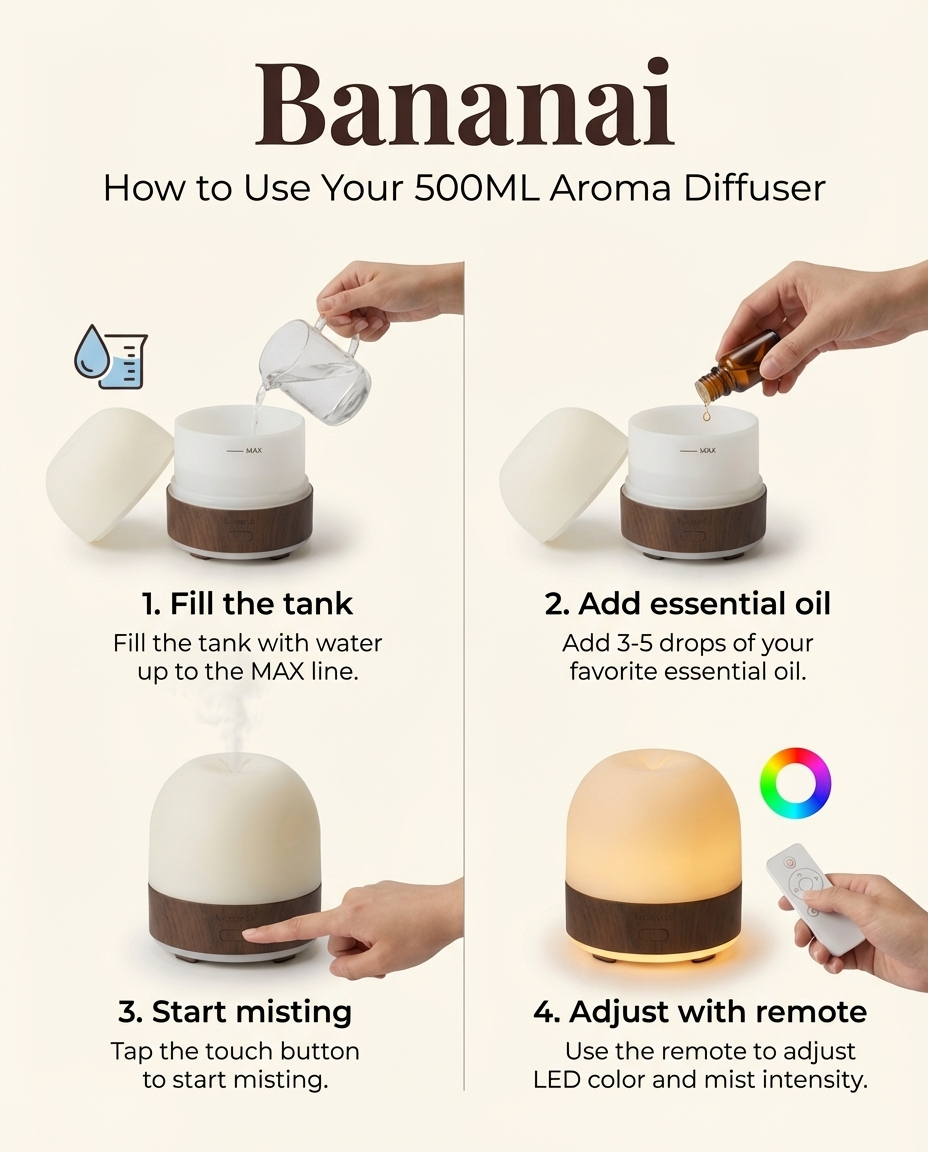
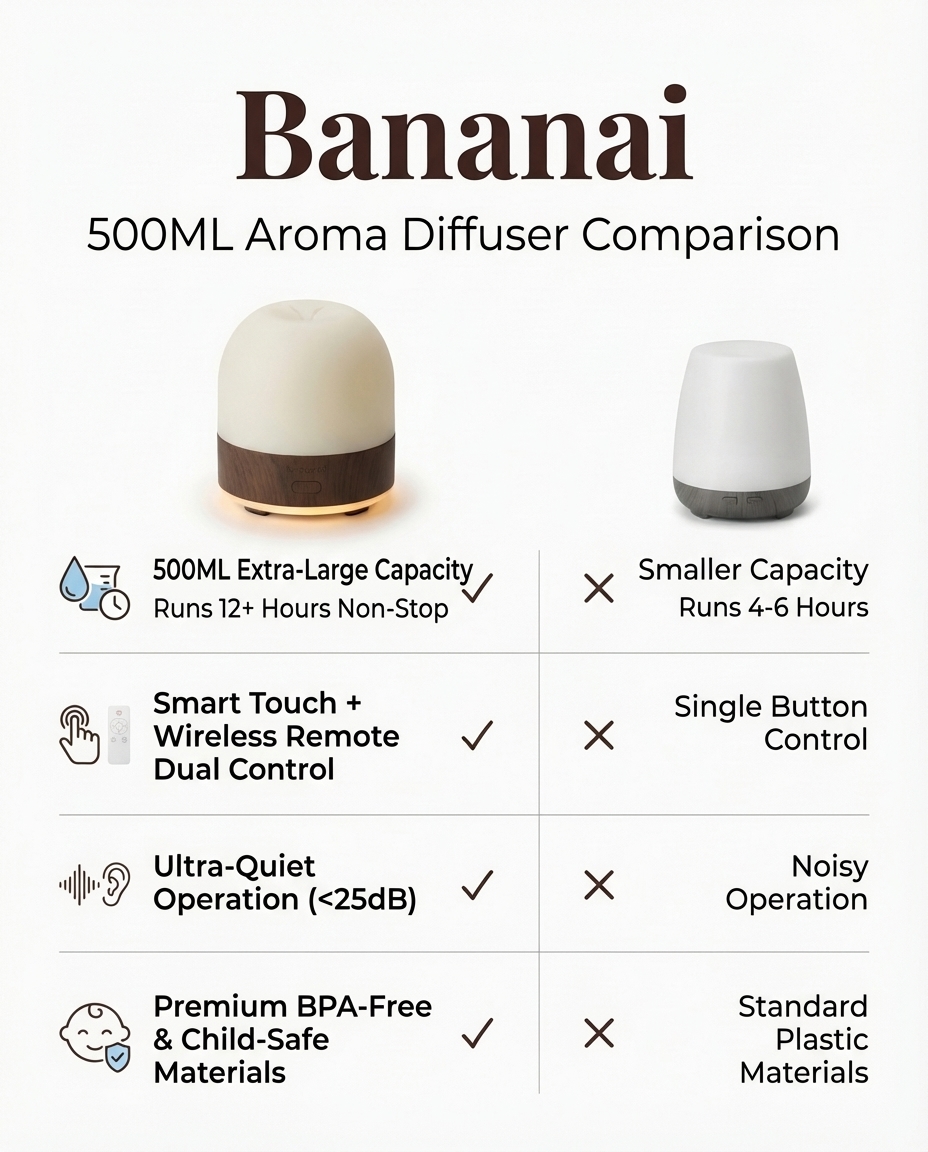
The brand name, font treatment, and layout language are consistent across all three — even though each graphic has different content and a different visual mood.
The Complete 4-Step Amazon Listing Images Workflow
Here’s how the full nano banana pro prompts workflow maps across all seven amazon listing images:
| Step | Images | Reference Images | What Gets Established |
|---|---|---|---|
| 1 | 01-primary | None | Product appearance (visual anchor) |
| 2 | 02-lifestyle, 03-features | 01-primary only | Consistent product + typography baseline |
| 3 | 04-benefits, 05-instructions, 06-comparison | 01-primary + 03-features | Product + typography consistency |
| 4 | 07-lifestyle-2 | 01-primary only | Different scene, same product |
Each step builds on the previous one. The visual anchor from Step 1 flows through every subsequent image. The typography baseline from Step 2 locks the graphic identity for Steps 3 and beyond.
All 7 Nano Banana Pro Prompt Templates for Amazon Listing Images
01 — Primary Image
Create a clean product photo rendering for [Your Product Name] for use as the primary image on an Amazon listing. The product should be on a pure white background with professional studio lighting. The product is [your visual anchor description — 2-3 sentences describing shape, materials, colors, and key design details].
02 — Lifestyle Image (attach: 01-primary)
Using the attached image as the exact product to feature — maintain its identical appearance. Create a lifestyle image for an Amazon listing showing this product with a [target customer avatar] in a [setting]. The product is [size], [scale reference] — it should appear at realistic scale relative to the furniture and person in the scene.
03 — Features Graphic (attach: 01-primary)
Using the attached image as the exact product to feature — maintain its identical appearance. Make a clean aesthetic features graphic for an Amazon listing, optimized for mobile. Highlight: [feature 1], [feature 2], [feature 3], [feature 4]. Render the brand name '[Brand]' prominently at the top in a [font name] font, [color]. Subtitle text should use [subtitle font]. All body text should use [body font].
04 — Benefits Graphic (attach: 01-primary + 03-features)
Using the attached images as references — first image is the exact product (maintain identical appearance), second image is the design style guide (match its typography, layout language, and color palette). Make a clean aesthetic benefits graphic for an Amazon listing, optimized for mobile. Benefits: [benefit 1], [benefit 2], [benefit 3], [benefit 4]. Warm [atmosphere hint] atmosphere. Include the brand name '[Brand]' prominently.
05 — Instructions Graphic (attach: 01-primary + 03-features)
Using the attached images as references — first image is the exact product (maintain identical appearance), second image is the design style guide (match its typography, layout language, and color palette). Make a clean aesthetic how-to-use graphic for an Amazon listing, optimized for mobile. Steps: [step 1], [step 2], [step 3], [step 4]. Include the brand name '[Brand]' prominently.
06 — Comparison Graphic (attach: 01-primary + 03-features)
Using the attached images as references — first image is the exact product (maintain identical appearance), second image is the design style guide (match its typography, layout language, and color palette). Make a clean aesthetic competitor comparison chart for an Amazon listing, optimized for mobile. Compare: [Your Brand] vs [Competitor A] vs [Competitor B] on criteria: [criterion 1], [criterion 2], [criterion 3], [criterion 4], [criterion 5]. Use checkmarks and X marks. Include the brand name '[Brand]' prominently.
07 — Lifestyle Image 2 (attach: 01-primary)
Using the attached image as the exact product to feature — maintain its identical appearance. Create a lifestyle image for an Amazon listing showing this product with a [different customer avatar or same avatar in different context] in a [different setting from image 02]. The product is [size], [scale reference] — it should appear at realistic scale relative to the surroundings.
Amazon Product Photography Tips from Google’s Official Prompting Guide
Google’s official prompting guide contains detailed sections on image quality parameters that translate directly to better ai product photos. Here are the most actionable techniques for Amazon listings:
1. Lighting specification. Rather than “good lighting,” specify the lighting setup: “soft diffused studio lighting from camera-left with a subtle fill light from camera-right.” Named lighting setups produce more predictable, professional results than qualitative descriptions.
2. Camera and lens language. Phrases like “shot on a Sony A7R IV with an 85mm f/1.8 lens at f/8, ISO 100” tell the model to render in a photorealistic style with specific depth-of-field characteristics. For product photography, slightly stopped-down apertures keep the whole product sharp.
3. Color grading. Adding a color grade instruction (“warm golden-hour grade with lifted shadows” or “clean neutral grade with slight cool cast in shadows”) creates a consistent mood across lifestyle images without changing the product’s actual colors.
4. Materiality precision. Instead of “shiny,” write “high-gloss lacquered surface with visible specular highlights.” Instead of “soft,” write “matte brushed anodized aluminum.” Precise material language produces accurate surface rendering — critical for amazon product photography in categories like electronics, kitchenware, and beauty tools.
5. Text rendering control. For graphics with brand names and callout text, always specify both the font name and a fallback instruction: “Render ‘[Brand]’ in Montserrat Bold. If Montserrat is unavailable, use a clean geometric sans-serif with similar proportions.” This reduces the chance of text appearing as a decorative approximation of your font.
Brand customization. When you’ve settled on your font stack and color palette, create a one-paragraph “brand voice” block you append to every graphic prompt. This is faster than re-specifying everything each time, and it keeps the model oriented toward your brand rather than defaulting to generic “premium product” aesthetics.
Iteration strategy. Generate three variations of each image. Pick the strongest one as your primary candidate, use the second-best as your reference for the next prompt, and discard the third. This keeps your reference chain based on the best available output rather than just the first acceptable one.
Using Banana AI’s chat interface, you can run these nano banana pro prompts in a conversational workflow — attach your reference images inline, iterate quickly with follow-up messages, and keep your entire generation session in one place rather than juggling files across tabs. The result: sharper, more consistent ai product photos in less time.
Why This Workflow Produces Consistent ai product images
The underlying reason this amazon product photography workflow succeeds is that it treats consistency as a system-design problem rather than a prompting problem. Most sellers try to write more detailed individual nano banana pro prompts to get better images. This workflow instead builds a reference chain — each image anchors the next — so the model has visual proof of what your product looks like rather than relying on text descriptions alone.
The dual-reference technique is the clearest example of this. By attaching both the product image and the typography style guide, you’re giving Nano Banana Pro a complete visual brief in the same way a human art director briefs a photographer and a graphic designer simultaneously. The prompt just fills in the content gaps.
This is also why the primary image matters so much. Every inconsistency in your visual anchor propagates forward. Spend extra iterations getting Image 01 exactly right — the payoff compounds across the entire listing.
The same logic applies to the features graphic as your typography baseline. If you later decide you want different fonts, just regenerate the features graphic and re-run Steps 3 and 4 with the new version. The entire graphic system updates consistently because every graphic references the same source.
Start Creating Your Amazon Listing Images
A complete 7-image Amazon listing that meets all amazon image requirements — white background primary, lifestyle shots, feature callouts, benefits, instructions, comparison chart — is now a morning’s work rather than a week’s budget. The nano banana pro prompts in this guide have been tested across multiple product categories and produce consistent, commercially viable results without a photographer, graphic designer, or expensive studio session.
For ready-to-use prompt templates organized by product category, visit our Amazon listing prompt library — each template includes the visual anchor description structure, pre-filled typography instructions, and the Relationship Instruction wording for reference images.
To start generating your own ai product photos right now, head to Banana AI’s chat interface and paste in your first prompt. New accounts include free credits — enough to run all seven nano banana pro prompts in this guide before you spend anything.
The visual anchor is waiting. Go build your listing.